Are you a coach, course creator, or membership site owner struggling to get calls booked for your free 1:1 sessions? If so, this guide is for you. I’m sharing a step-by-step framework that I used to successfully to get call bookings for my Scale With Evelyn mastermind program using just two simple tools: Facebook™ Ads and a booking calendar. This framework is designed to be straightforward and actionable—even if you’re new to Facebook™ Ads. Whether you’re just starting out or are an experienced professional, this framework provides a clear process to help you take actionable steps toward improving your call-booking system.
The Story behind this framework
Since 2020, I’ve generated $7M+ with 30k paid members, won the Two Comma Club Award, ranked 4th in Hormozi’s 100 challenge ($247k in 90 days), and secured 2nd place in the first-ever Skool Games with my partner Jessa ($81k MRR in 30 days). Known as the Facebook™ and Instagram™ ads expert with 1.5M€ invested, I’m excited to help you with these challenges. Check out my YouTube to learn for free, join my skool waitlist, or apply for my mastermind.
As someone new to high-ticket programs, I needed a system to attract qualified, potential clients. So I started by promoting to my existing email list of over 60,000 subscribers. My love for scaling pushed me to find a more consistent and strategic approach for generating leads.
This drive led me to develop and test a Facebook™ Ads and Calendly™ booking framework. In my experience, this framework helped generate call bookings and new clients within a short period. Results may vary depending on individual effort, approach, and other factors.
Today, I’m excited to share this step-by-step framework with you, so you can start implementing it right away.

HI I’M EVELYN – AD EXPERT FOR MEMBERSHIPS, COACHES & SKOOL
I help with offers, ads, funnels and emails.
Since 2020, I’ve generated $8M+ with 30k paid members, won the Two Comma Club Award, ranked 4th in Hormozi’s 100 challenge ($247k in 90 days), and secured 2nd place in the first-ever Skool™ Games with my partner Jessa ($81k MRR in 30 days). Known as the Facebook™ and Instagram™ ads expert with 1.5M€ invested, I’m excited to help you with these challenges. Check out my YouTube to learn for free, join my Skool™ waitlist, or apply for my mastermind.
Who is this for?
This framework is perfect for coaches at different stages of their journey.
If you’re a relatively new coach, it’s ideal for you if you’re looking to give away free sessions to gain market insights, sharpen your skills, and collect valuable feedback from your first clients.
It’s also a great fit for experienced coaches who have already used strategies like video sales letters or webinar funnels to book calls and sell your services.
This framework is designed to help you simplify your process and create an effective system to connect with potential leads.
The approach relies on two essential tools:
Facebook™ Advantage+ Shopping Campaign and Calendly™. Together, they provide a powerful yet straightforward setup to attract high-quality leads and make it easy for potential clients to book a meeting with you.
If this sounds like you, keep reading to learn how to implement this framework and take actionable steps toward improving your call-booking process.
How to Use Facebook™ Ads to Drive Traffic and Book Calls
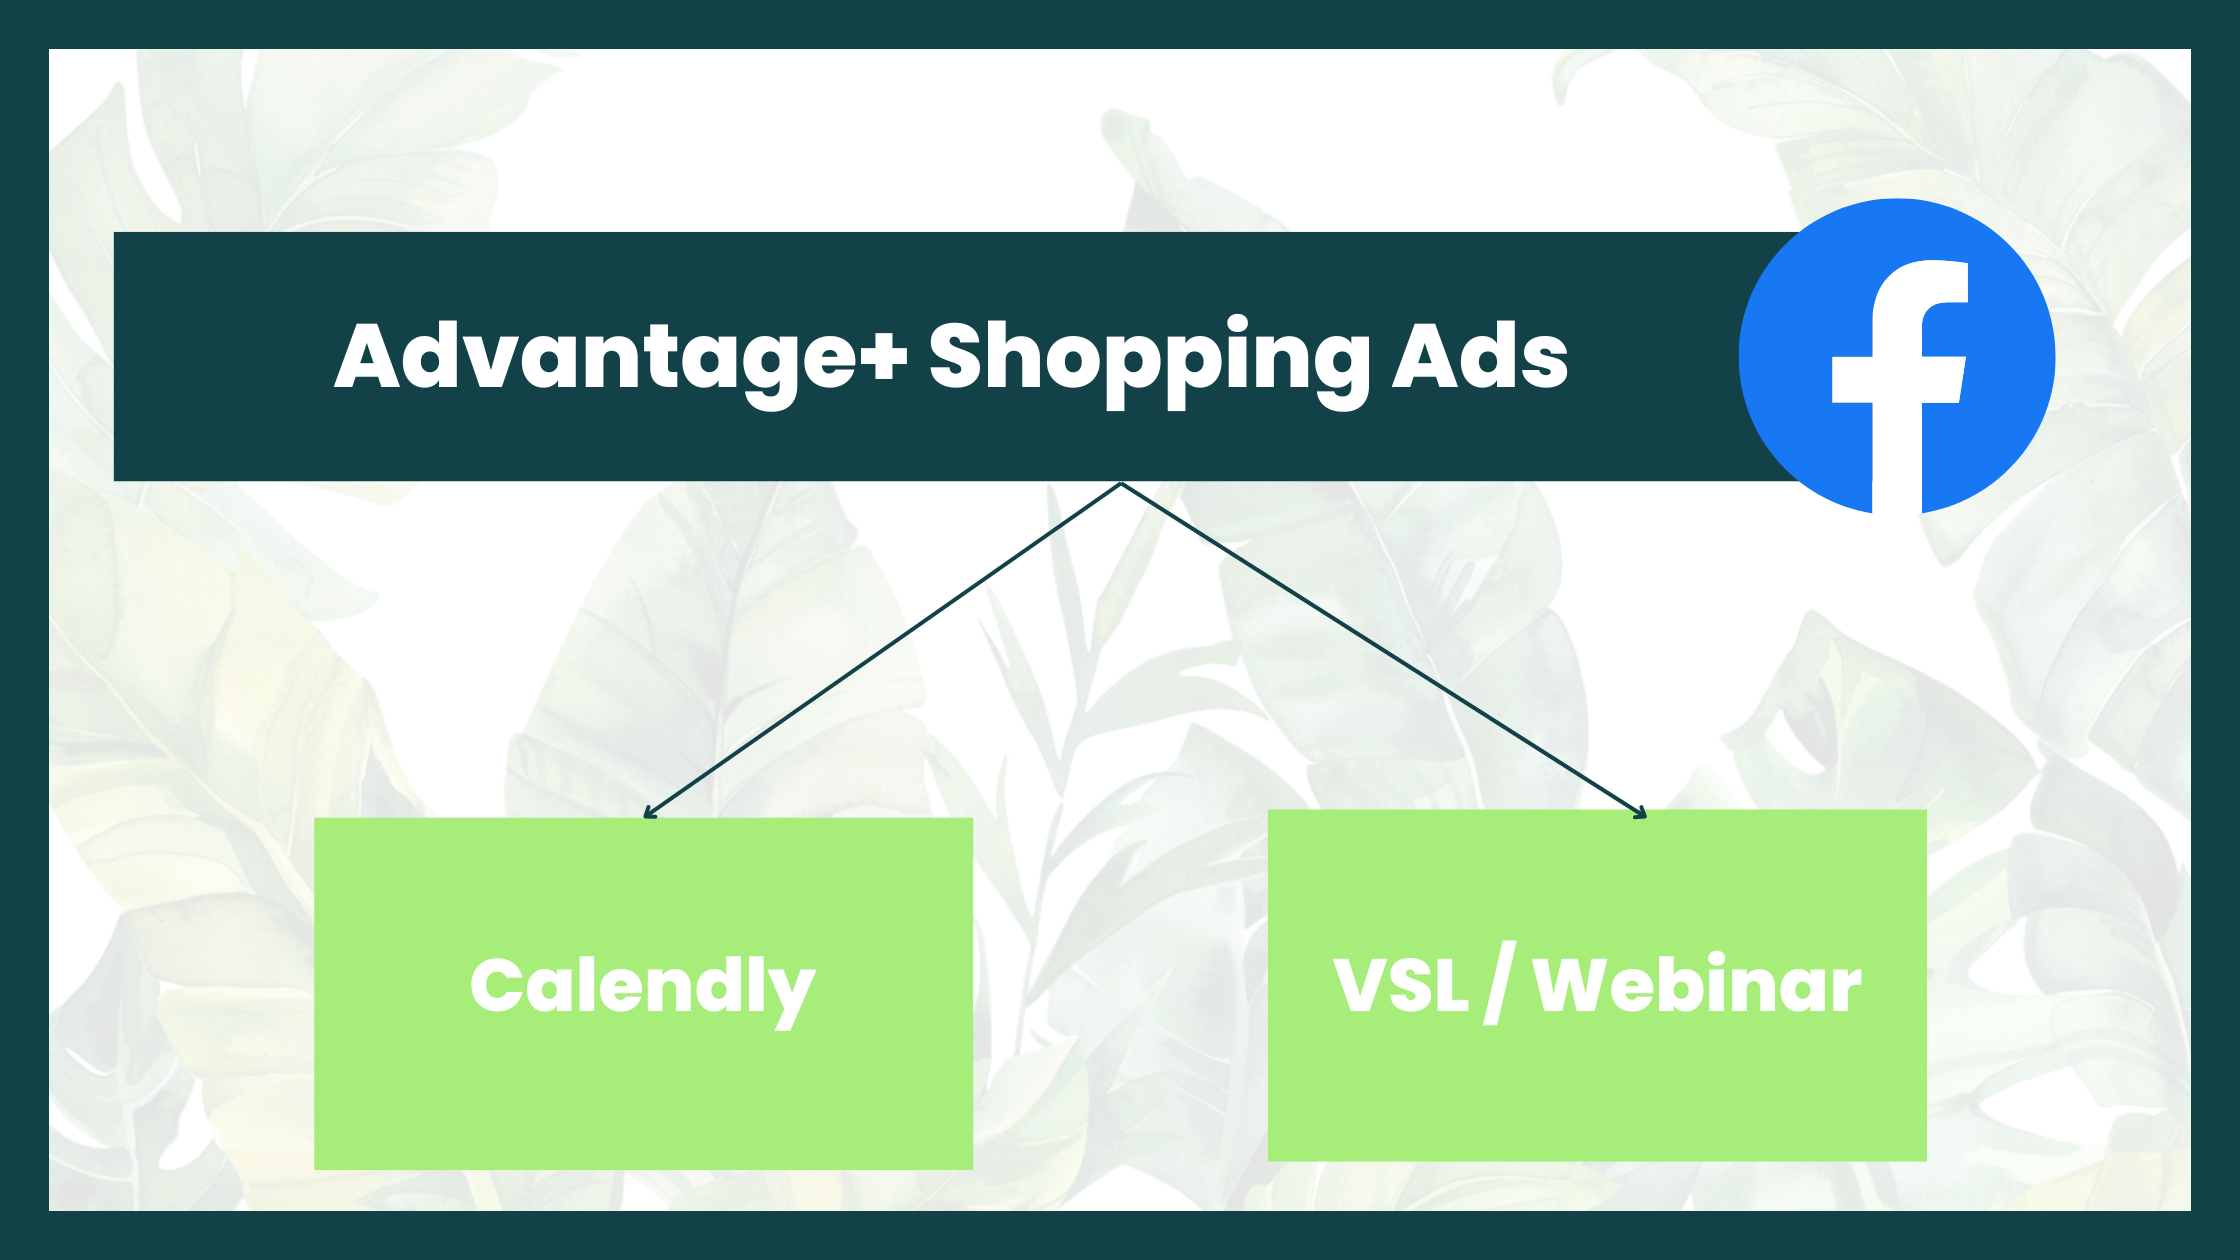
This framework revolves around using Facebook™ Advantage+ Shopping Campaigns to drive traffic and ultimately book calls through Calendly™. There are two main approaches you can take, depending on your setup and preferences:
Option 1: Direct Traffic to Calendly™
This approach sends traffic directly from your Facebook™ ad to your Calendly™ booking page. It’s a simple and effective method, especially for those who want to skip additional steps in the funnel. To ensure high-quality leads, I recommend adding qualifying questions to your Calendly™ form. These questions help filter out uncommitted prospects and make sure you’re only speaking to those ready to take action.
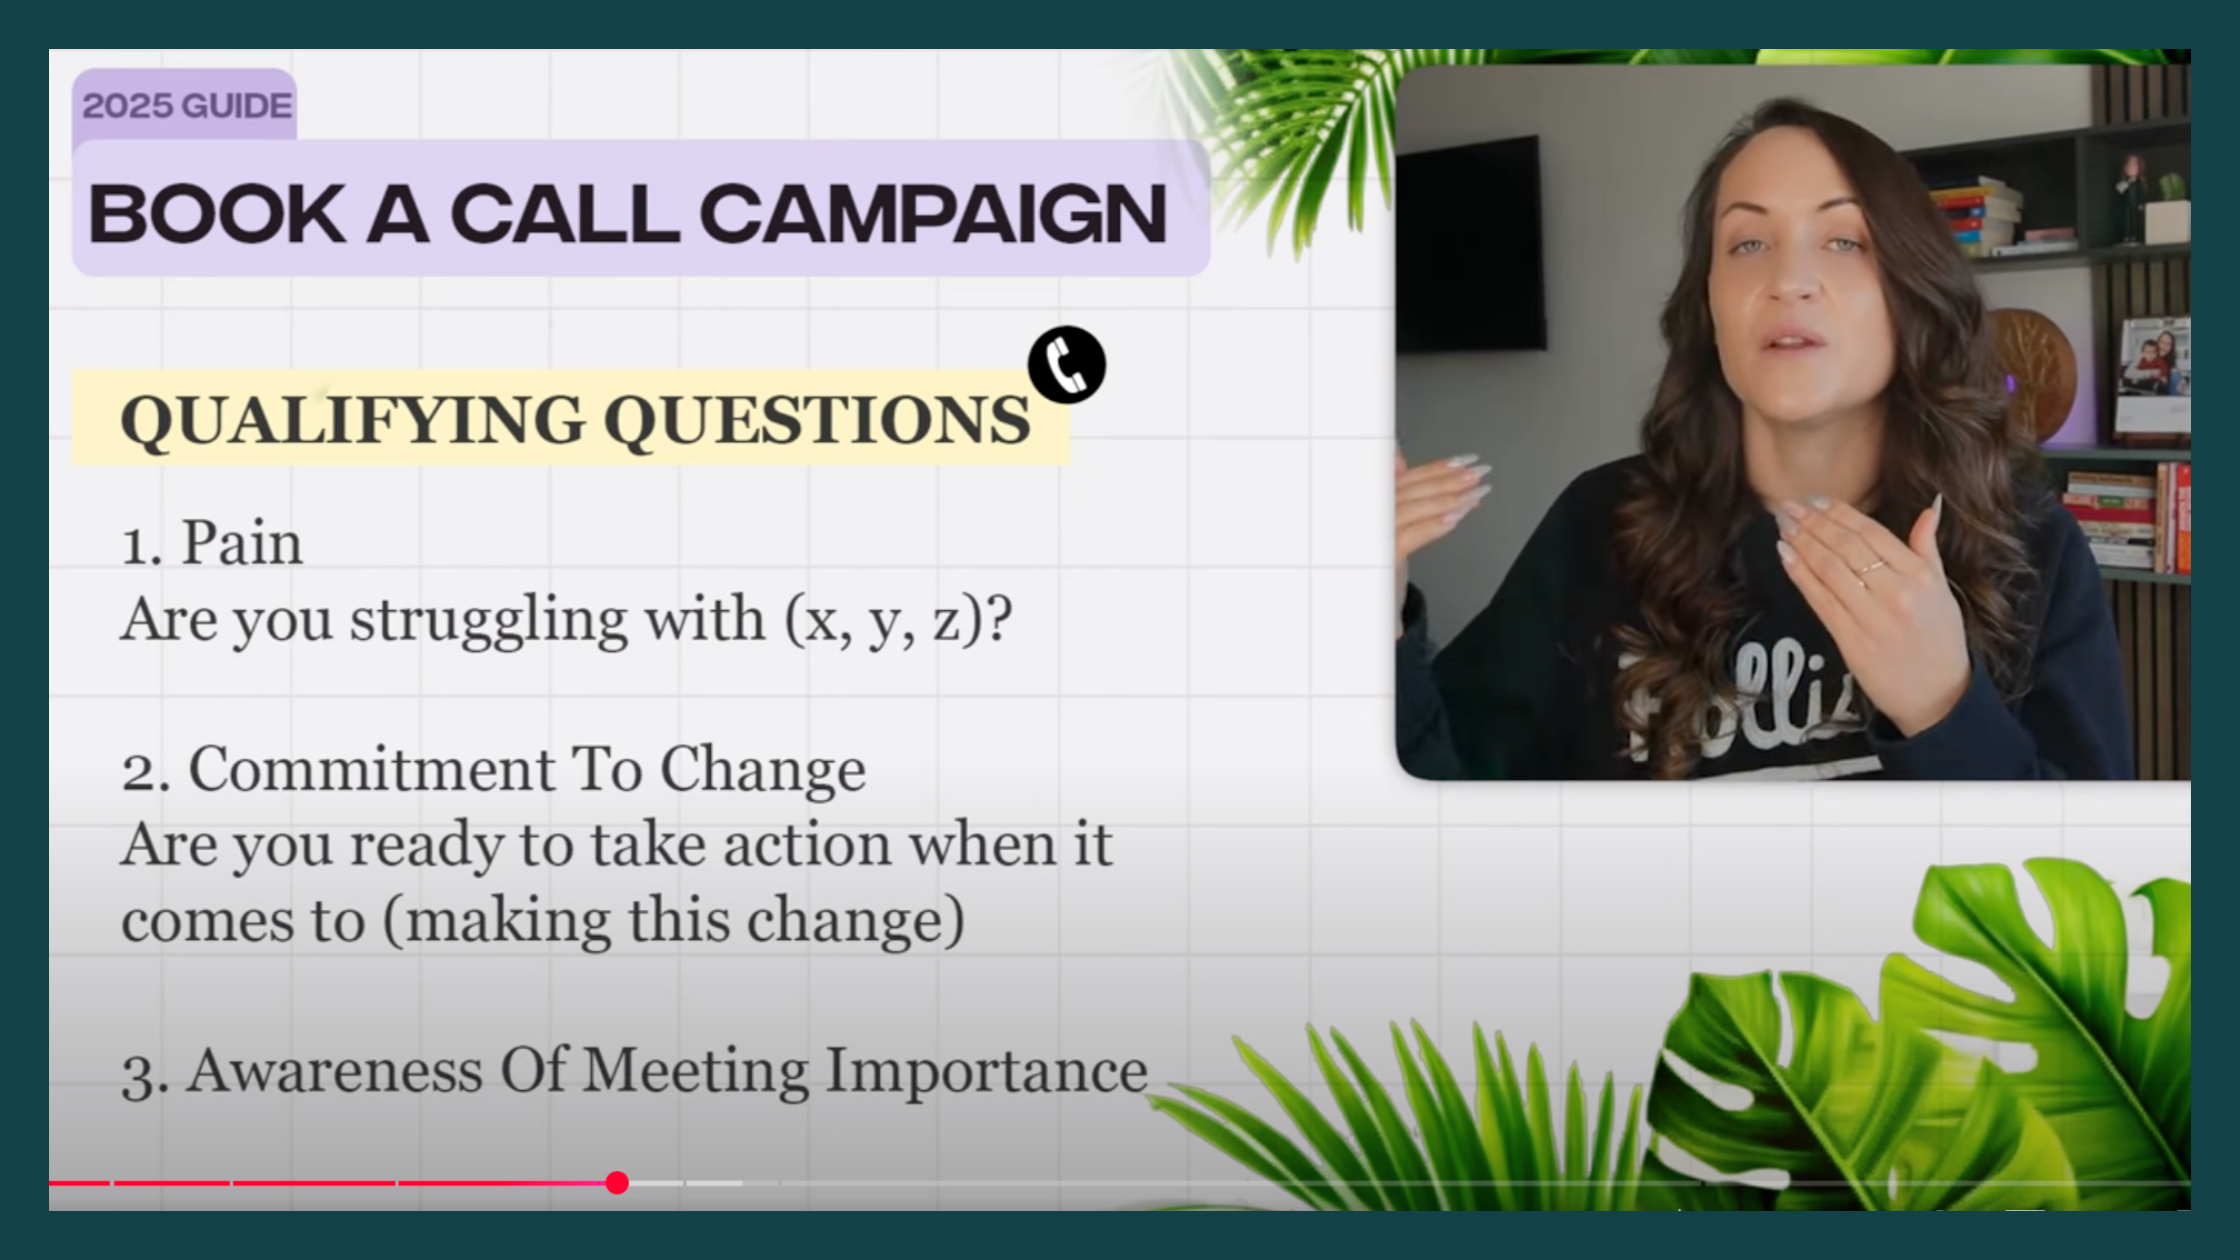
Here are the three types of qualifying questions to include:
No.1: Ask About Their Pain Points
Make sure the person booking the call is actually experiencing the struggles you can help with. For example, you could ask:
“Are you currently struggling with [insert specific challenges]?”
This ensures you’re connecting with people who genuinely need your help.
No.2: Check Their Commitment
Gauge how ready they are to take action. You can ask something like:
“Are you ready to take the necessary steps to make changes in [area of focus]?”
This helps filter out those who are not serious about moving forward.
No. 3: Set Expectations for Attendance
Let them know your time is valuable, and there are limited spots available. For example:
“Since these calls are one-on-one with me, can you confirm you’ll attend the call as scheduled?”
This sets clear expectations and reduces no-shows.
If you’re not driving traffic directly to Calendly™ and are using a funnel instead, these questions might not be necessary. But for direct bookings, adding them ensures that your calendar is filled with motivated, high-quality prospects.
Option 2: Traffic to a Video Sales Letter or Webinar Funnel
Alternatively, you can direct traffic to a video sales letter or webinar funnel before providing the Calendly™ link. This option works well if you want to warm up your leads by educating them about your services or demonstrating your expertise first. Once the prospects have gone through the video or webinar, they can access the Calendly™ link to book a call.
Why I recommend Calendly™
In both cases, Calendly’s integration with Facebook™ ensures seamless tracking, allowing you to optimize your campaigns for the event “Meeting Scheduled.” This makes it easy to monitor the effectiveness of your ads and continuously improve your approach.
Each option serves a different purpose, so choose the one that aligns best with your goals and the level of engagement you want with your prospects.
Overview: Steps to Implement the Framework
Before we dive into the details, here’s a quick overview of what needs to be done:
Set Up Your Calendly™ Account
Create and configure your calendar in Calendly™. This includes setting availability, adding qualifying questions (if applicable), and ensuring the setup aligns with your booking goals.
Connect Calendly™ with Facebook™
Now you integrate Calendly™ with Facebook™. This involves adding your Facebook™ Pixel to Calendly™, ensuring that all events—such as booking a meeting—are properly tracked.
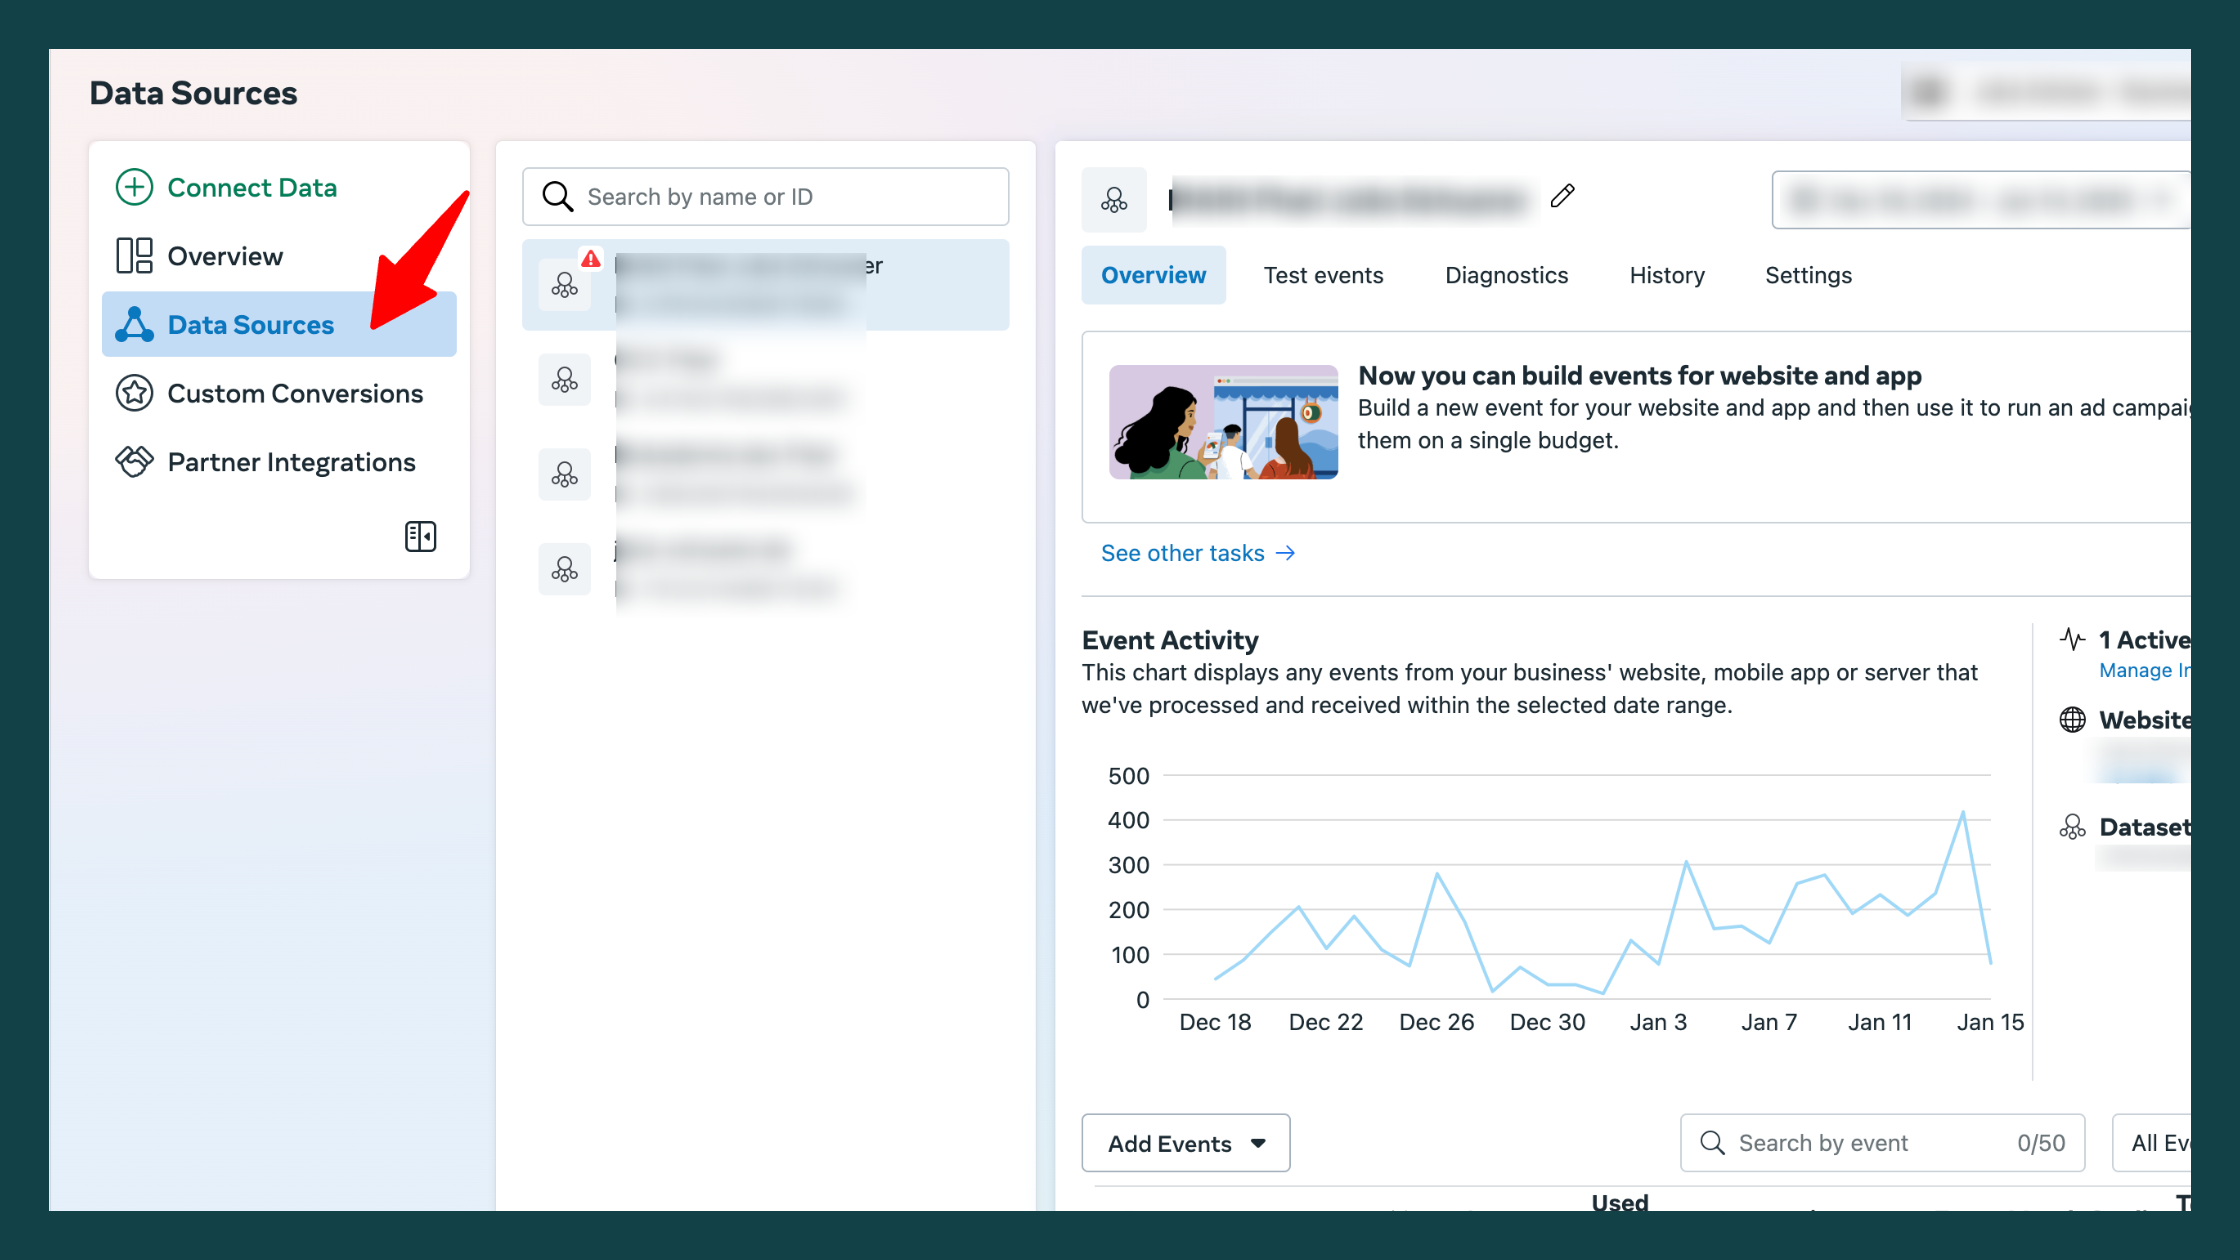
Step 1: Navigating to the Events Manager
The first place we need to go is the Events Manager. This is where your pixel and data set are located. You’ll want to grab your data set ID from here and then head over to Calendly™ to complete the integration.
Step 2: Integrating the Meta Pixel with Calendly™
To connect your Meta Pixel to Calendly™, you’ll need a paid Calendly™ account, which starts at $12 per month. Once you have your account ready, follow these steps:
#1: Log in to your Calendly™ account.
#2: Go to the Integrations and Apps section in the settings menu. In the search box, type ‘facebook’ and click on the Facebook™ icon that appears.
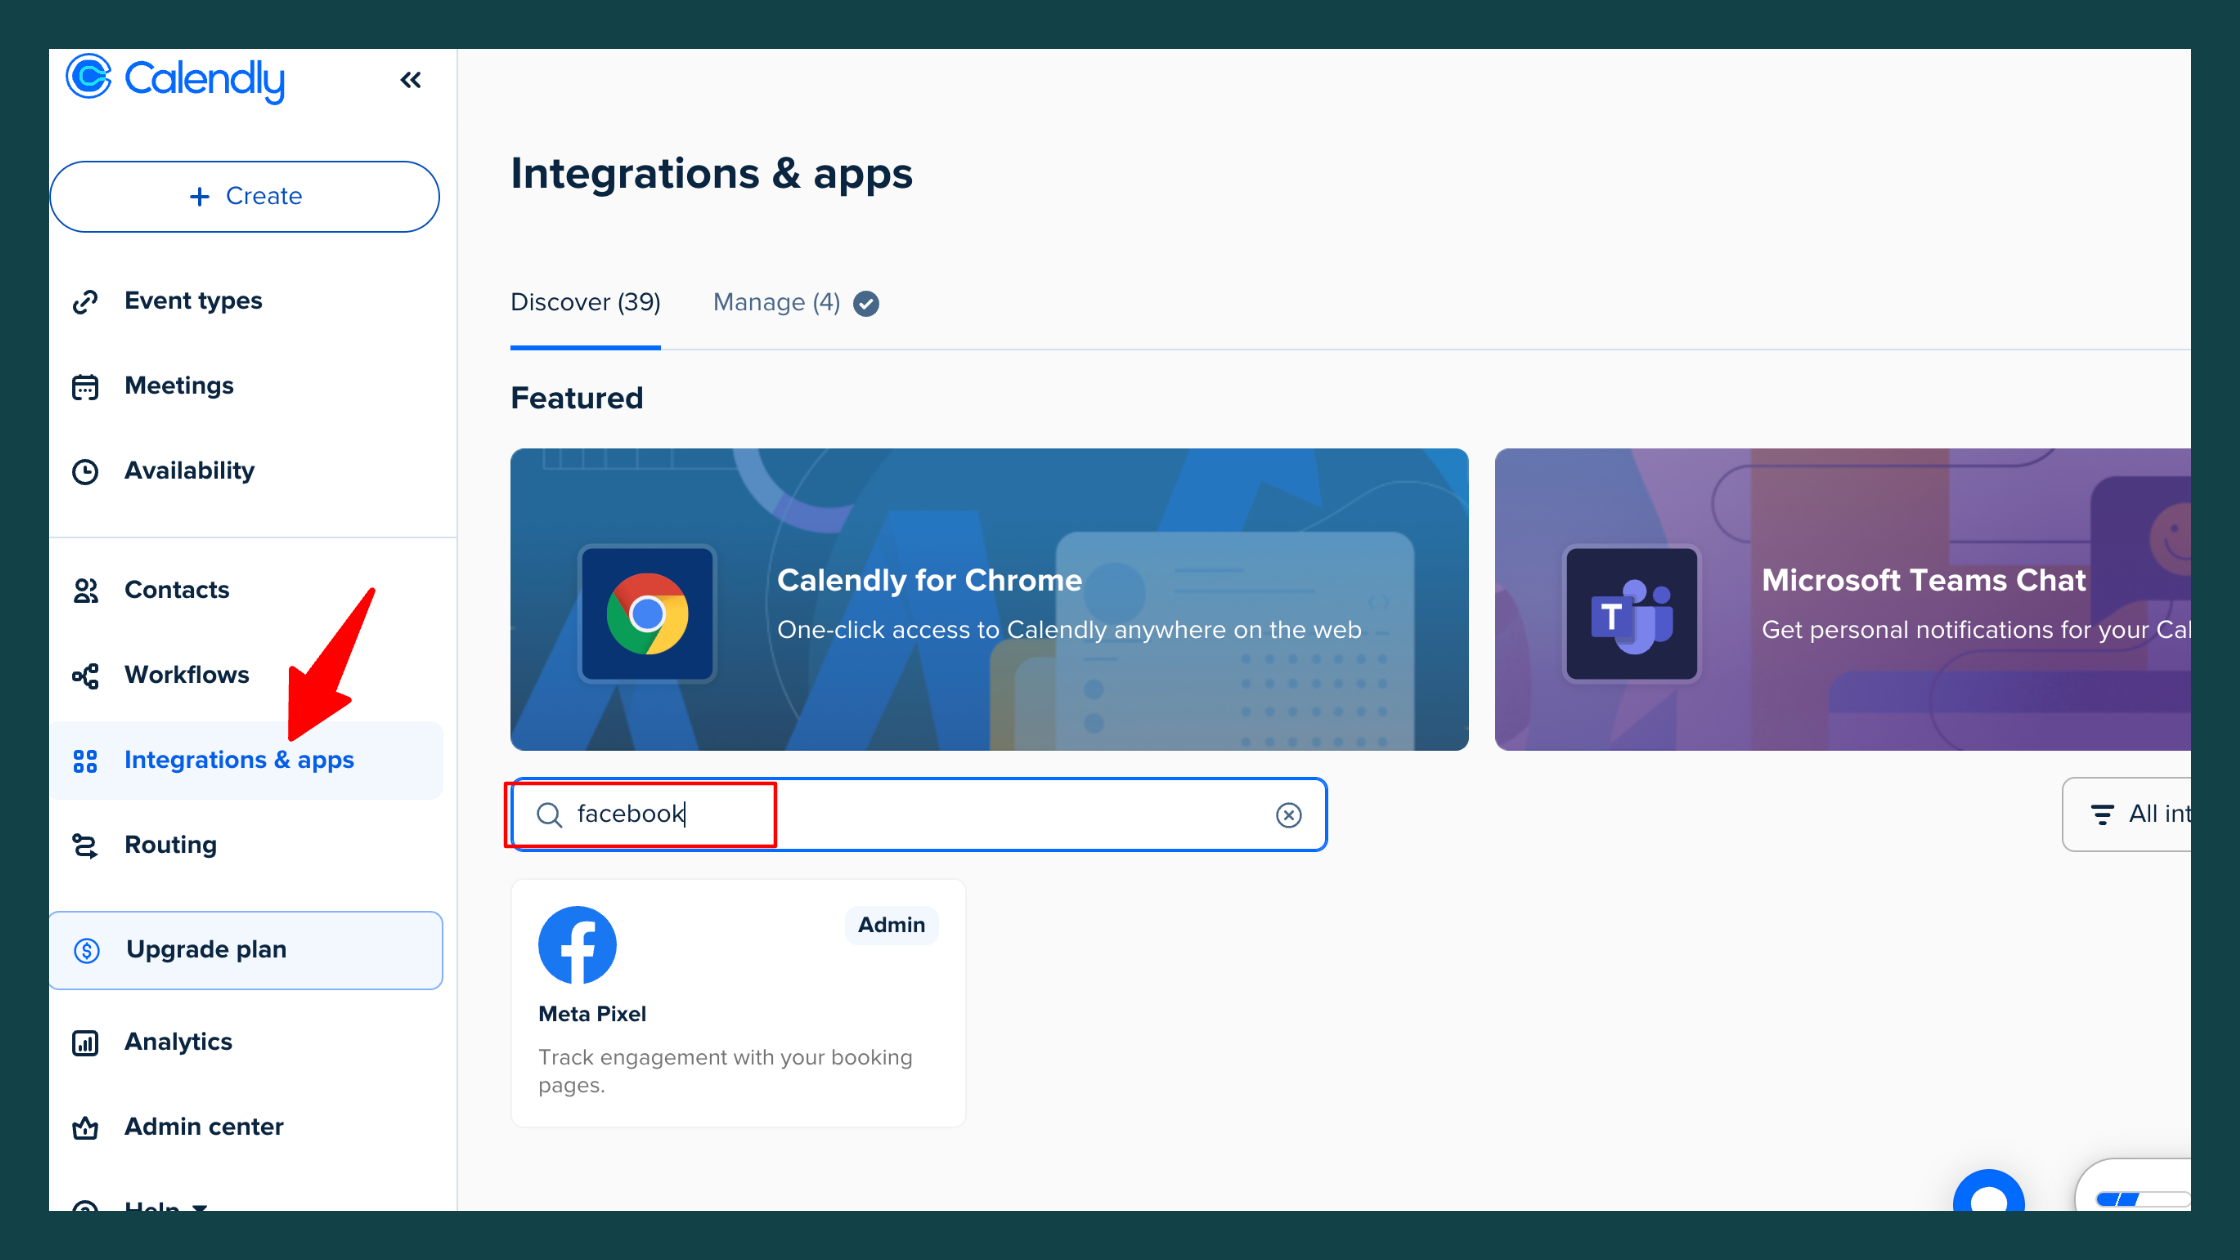
#3: Paste your Meta Pixel ID into the provided field and click Save, and your Meta Pixel will be connected to Calendly™.
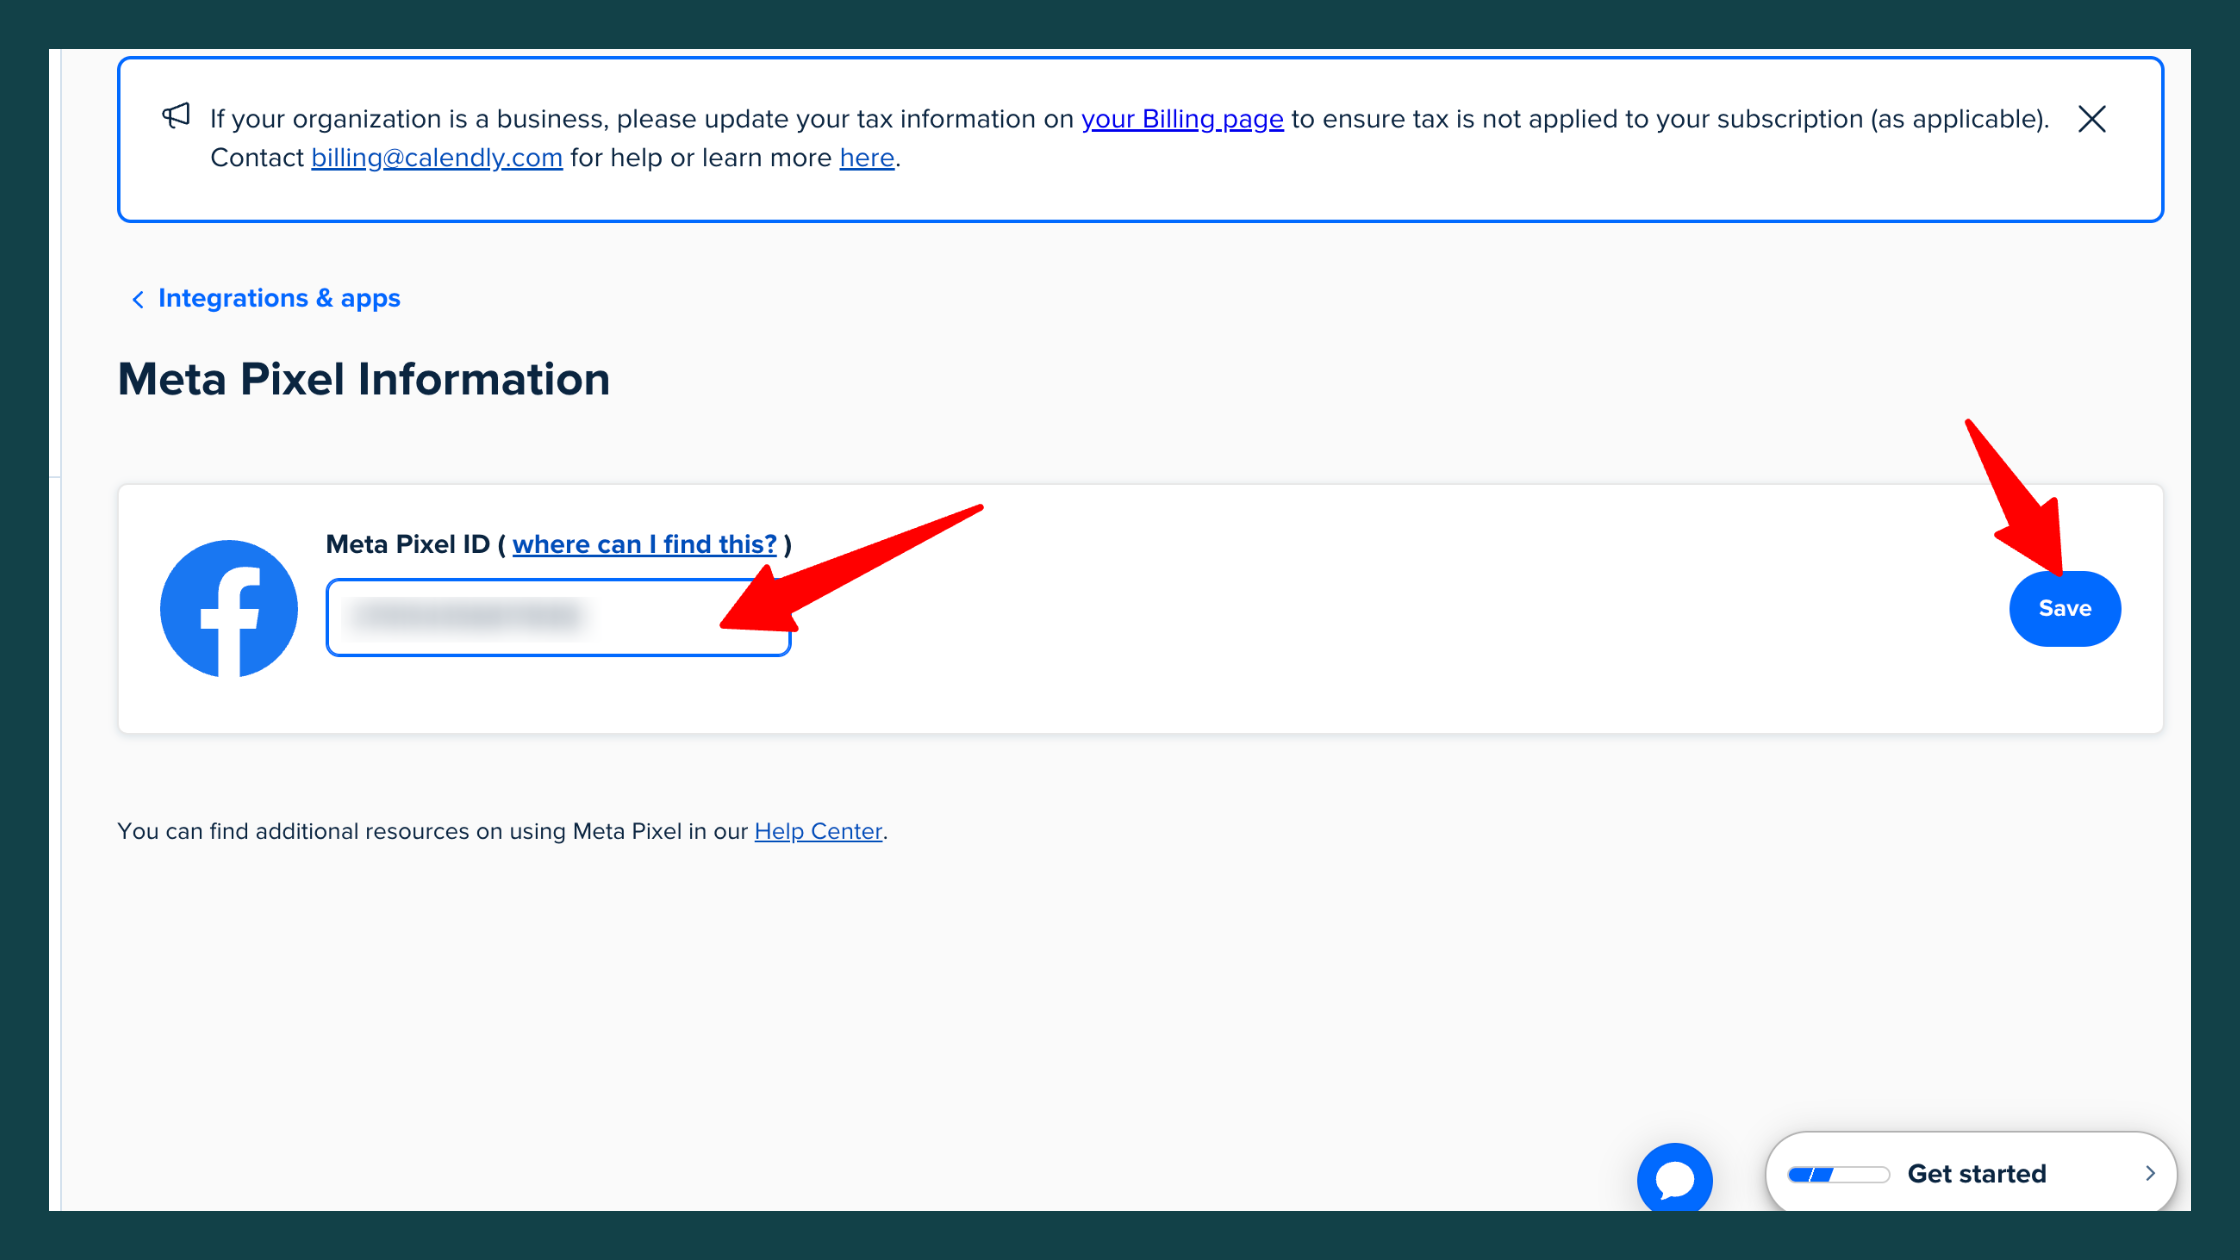
With this setup, the calendar event is’pixelated’ and your calendar events will now send tracking data back to Facebook™, allowing you to monitor and optimize your campaigns effectively.
Step 3: Setting Up the Facebook™ Pixel Helper Chrome Extension
To ensure your Meta Pixel is set up correctly, you can use the Facebook™ Pixel Helper Chrome extension. Here’s how to get it up and running:
#1: Open your Chrome browser and go to the Chrome Web Store and search for Facebook™ Pixel Helper and click on the extension in the results.
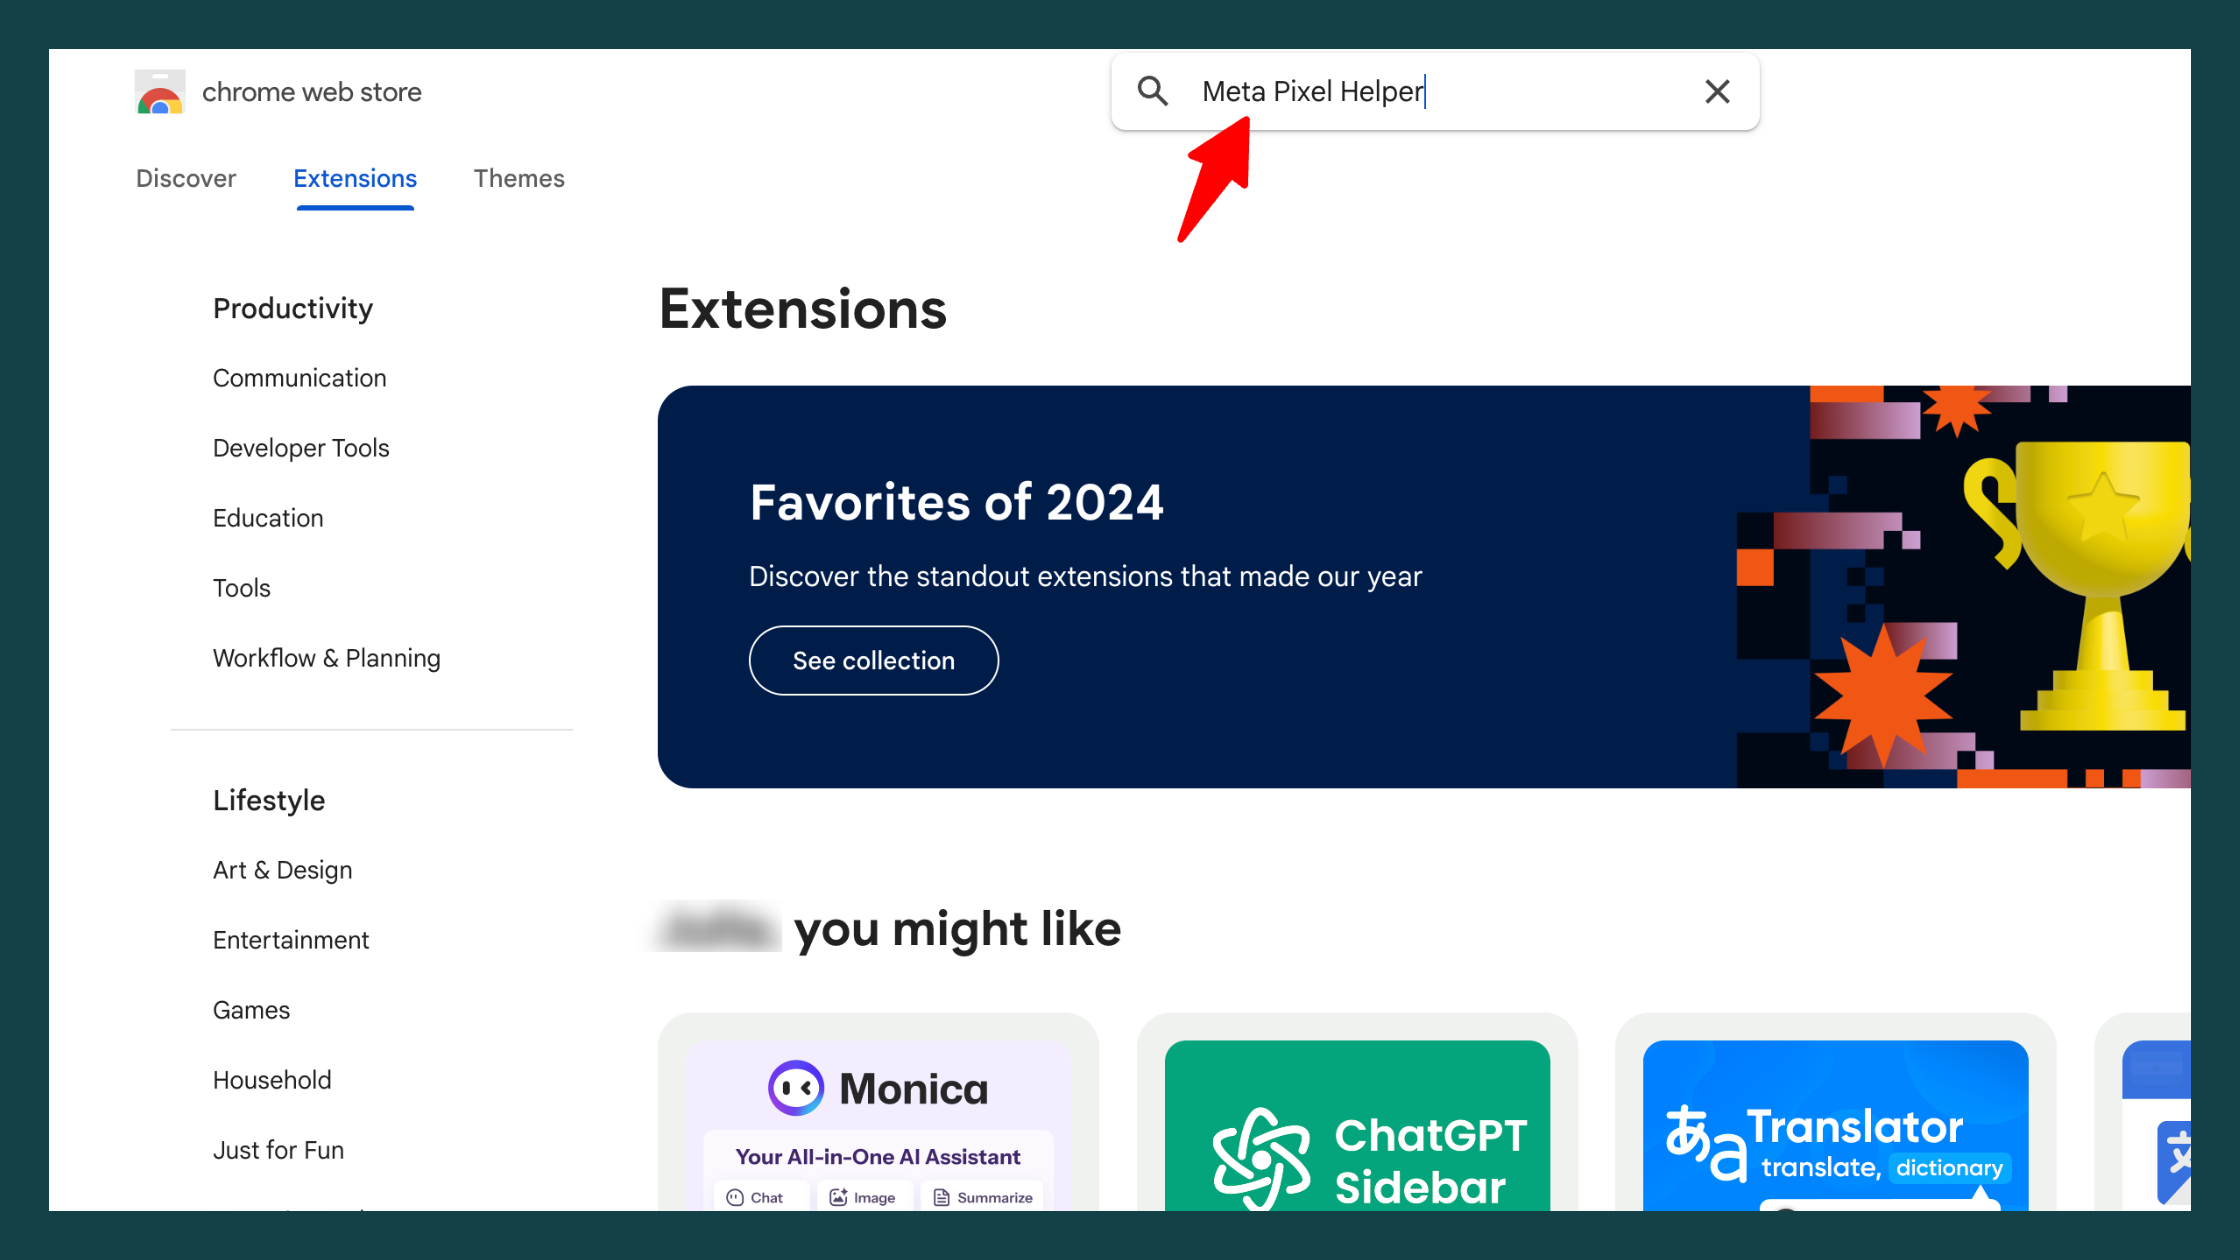
#2: Click Add to Chrome and follow the prompts to install it. Once installed, you’ll see the Pixel Helper icon in your browser’s toolbar.
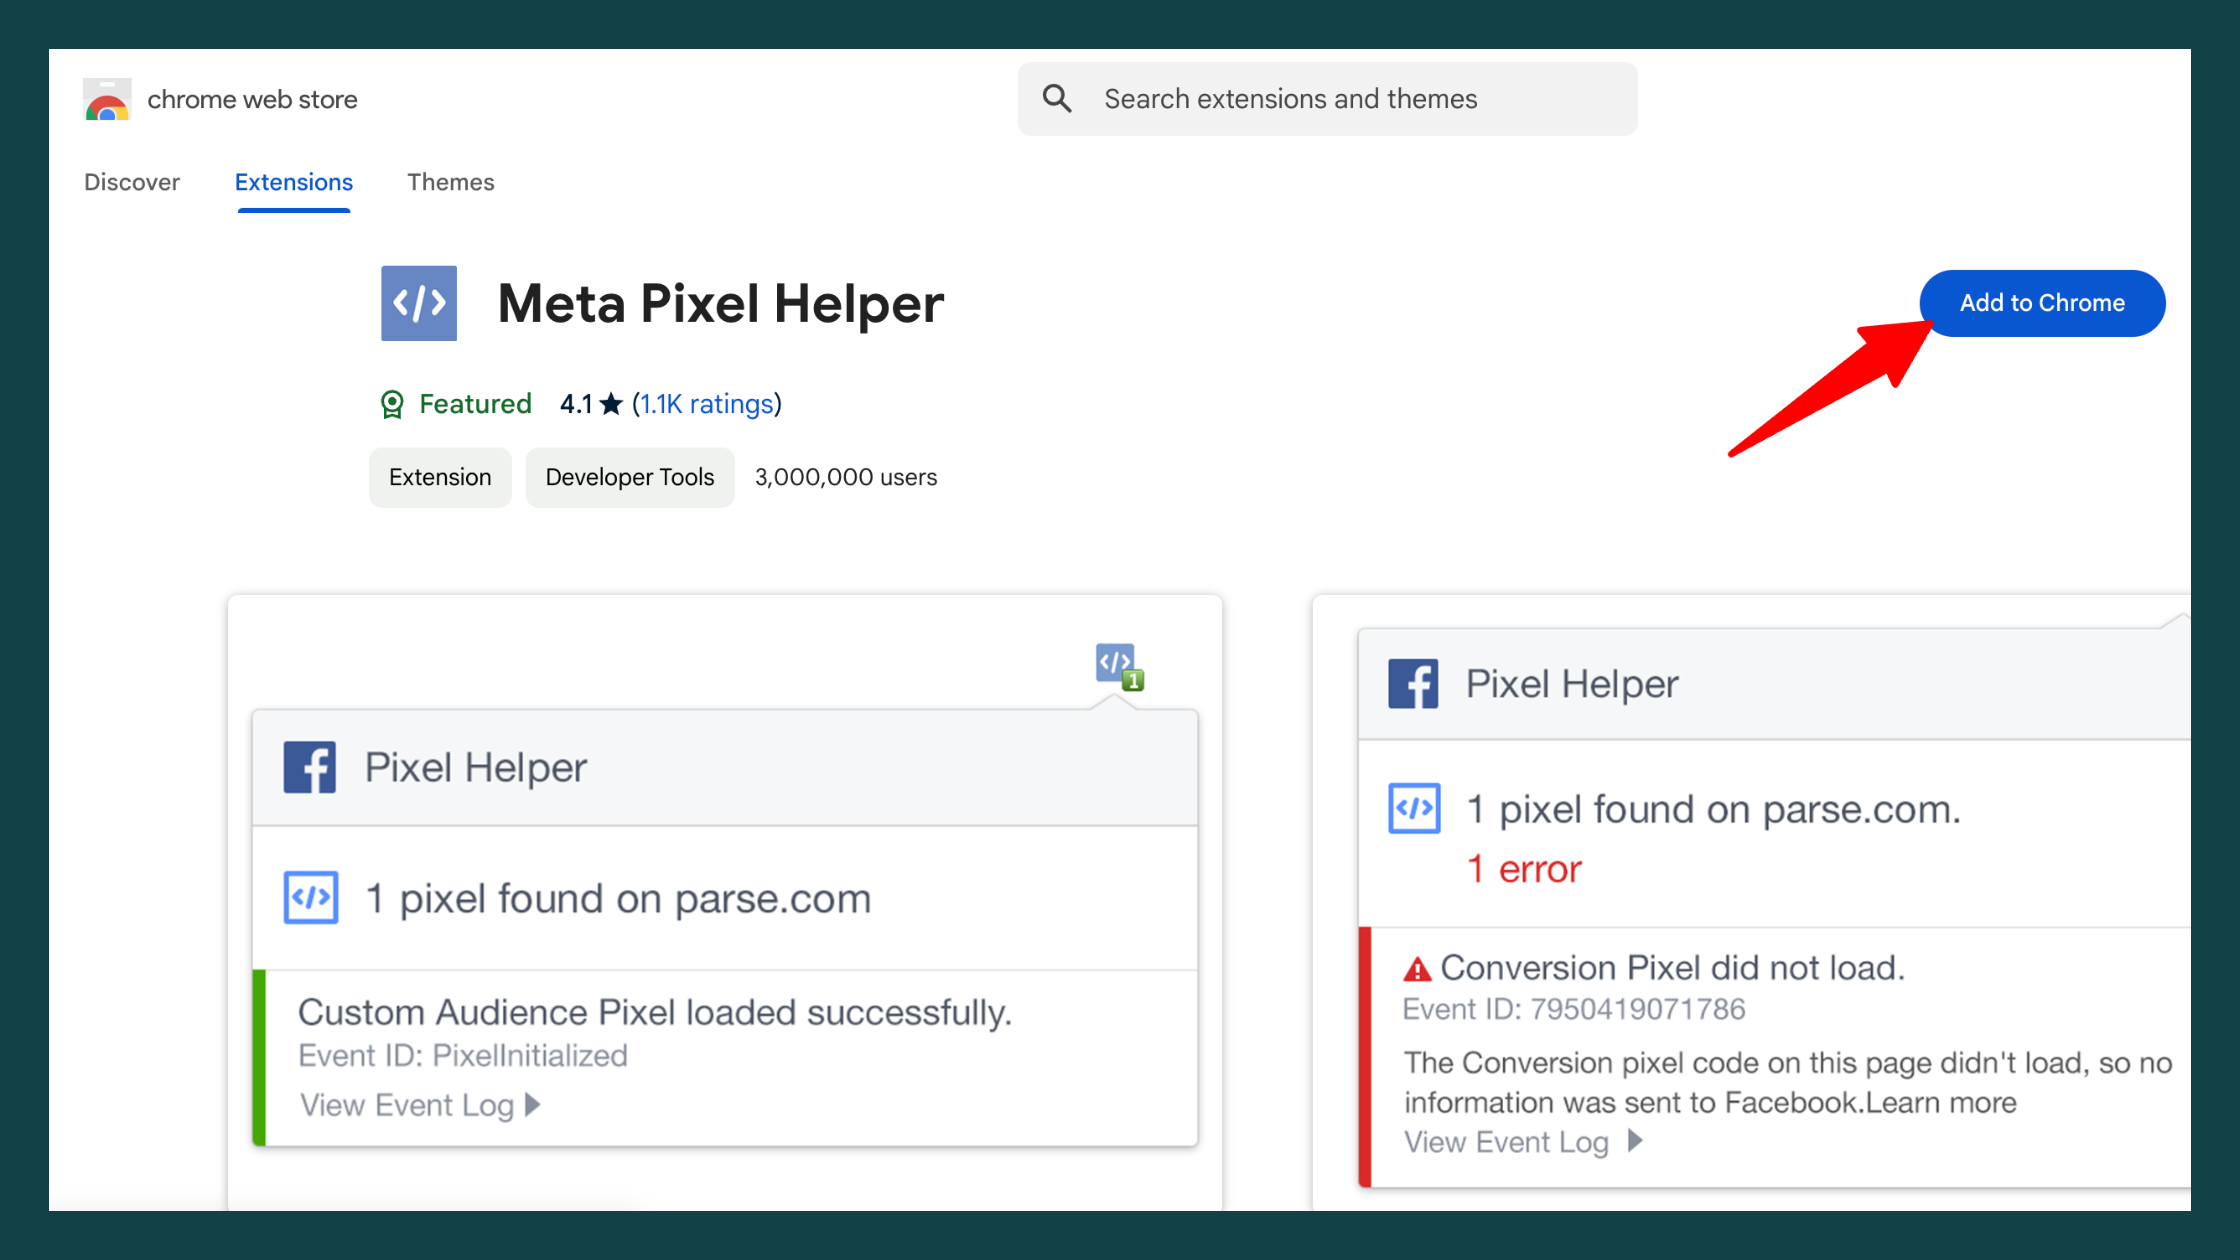
Now, when you visit your Calendly™ booking page or any other site where your Meta Pixel is active, the Pixel Helper will show you whether the pixel is firing correctly. It’s an easy way to double-check your setup and troubleshoot if needed.
Connect Calendly™ with Facebook™
Now you integrate Calendly™ with Facebook™. This involves adding your Facebook™ Pixel to Calendly™, ensuring that all events—such as booking a meeting—are properly tracked.
Step 1: Navigating to the Events Manager
The first place we need to go is the Events Manager. This is where your pixel and data set are located. You’ll want to grab your data set ID from here and then head over to Calendly™ to complete the integration.

Step 2: Integrating the Meta Pixel with Calendly™
To connect your Meta Pixel to Calendly™, you’ll need a paid Calendly™ account, which starts at $12 per month. Once you have your account ready, follow these steps:
#1: Log in to your Calendly™ account.
#2: Go to the Integrations and Apps section in the settings menu. In the search box, type ‘facebook’ and click on the Facebook™ icon that appears.
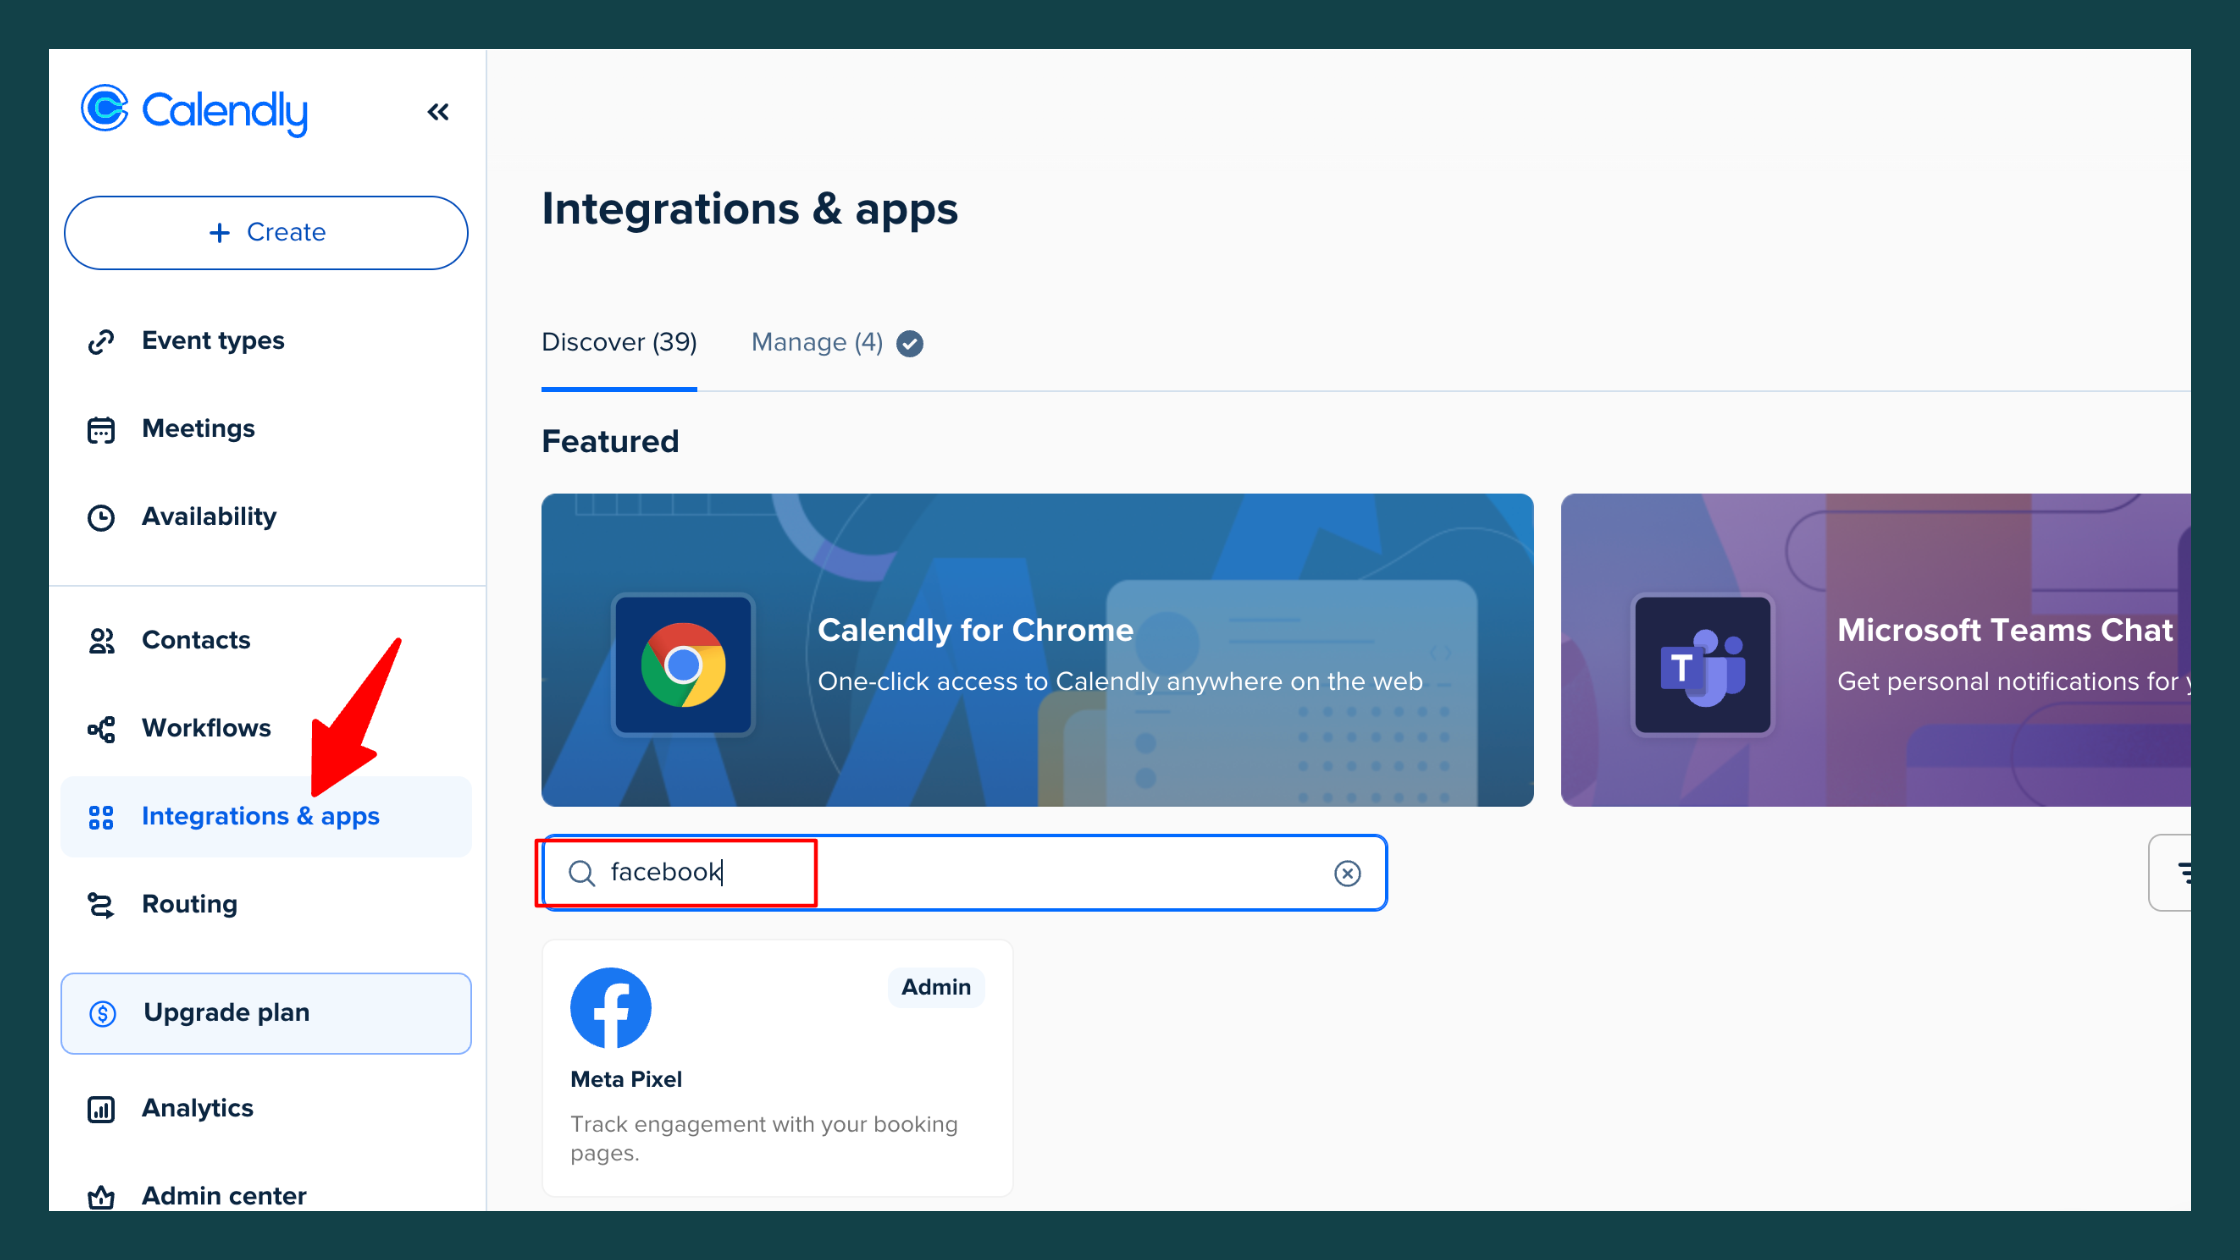
#3: Paste your Meta Pixel ID into the provided field and click Save, and your Meta Pixel will be connected to Calendly™.
With this setup, the calendar event is’pixelated’ and your calendar events will now send tracking data back to Facebook™, allowing you to monitor and optimize your campaigns effectively.
Overview of the Three Pixel Events in Calendly™
When integrating the Meta Pixel with Calendly™, three key pixel events are tracked throughout the booking process. These events provide valuable data that can help you optimize your campaigns and improve your booking flow.
#1: Page View
The Page View pixel fires as soon as someone lands on your booking page. This tracks the number of visitors coming to your page, giving you insights into how many people are clicking through from your ad or funnel.
#2: Invitee Select Time
The Invitee Select Time pixel fires when someone selects a time slot on your calendar page but doesn’t complete the booking. This data can help you identify gaps in your booking process. For example:
If many people select a time but don’t book, it might indicate that your availability needs adjustment.
You can also use this event to build a retargeting audience and run ads encouraging them to book or reach out directly with their preferred time.
#3: Invitee Meeting Scheduled
The Invitee Meeting Scheduled pixel fires when someone successfully books a meeting and lands on your thank-you page in Calendly™. This is a custom conversion that Calendly™ fires back to Facebook™, and it’s the final conversion event, indicating a completed booking. You can optimize your Facebook™ Ads campaign for this conversion to measure success and ensure your ads are driving actual bookings.
After you set up the integration, it may take up to 2 hours for the custom conversion events to appear in the Events Manager. Once they do, you’ll be able to track these events and use them to optimize your campaign effectively.
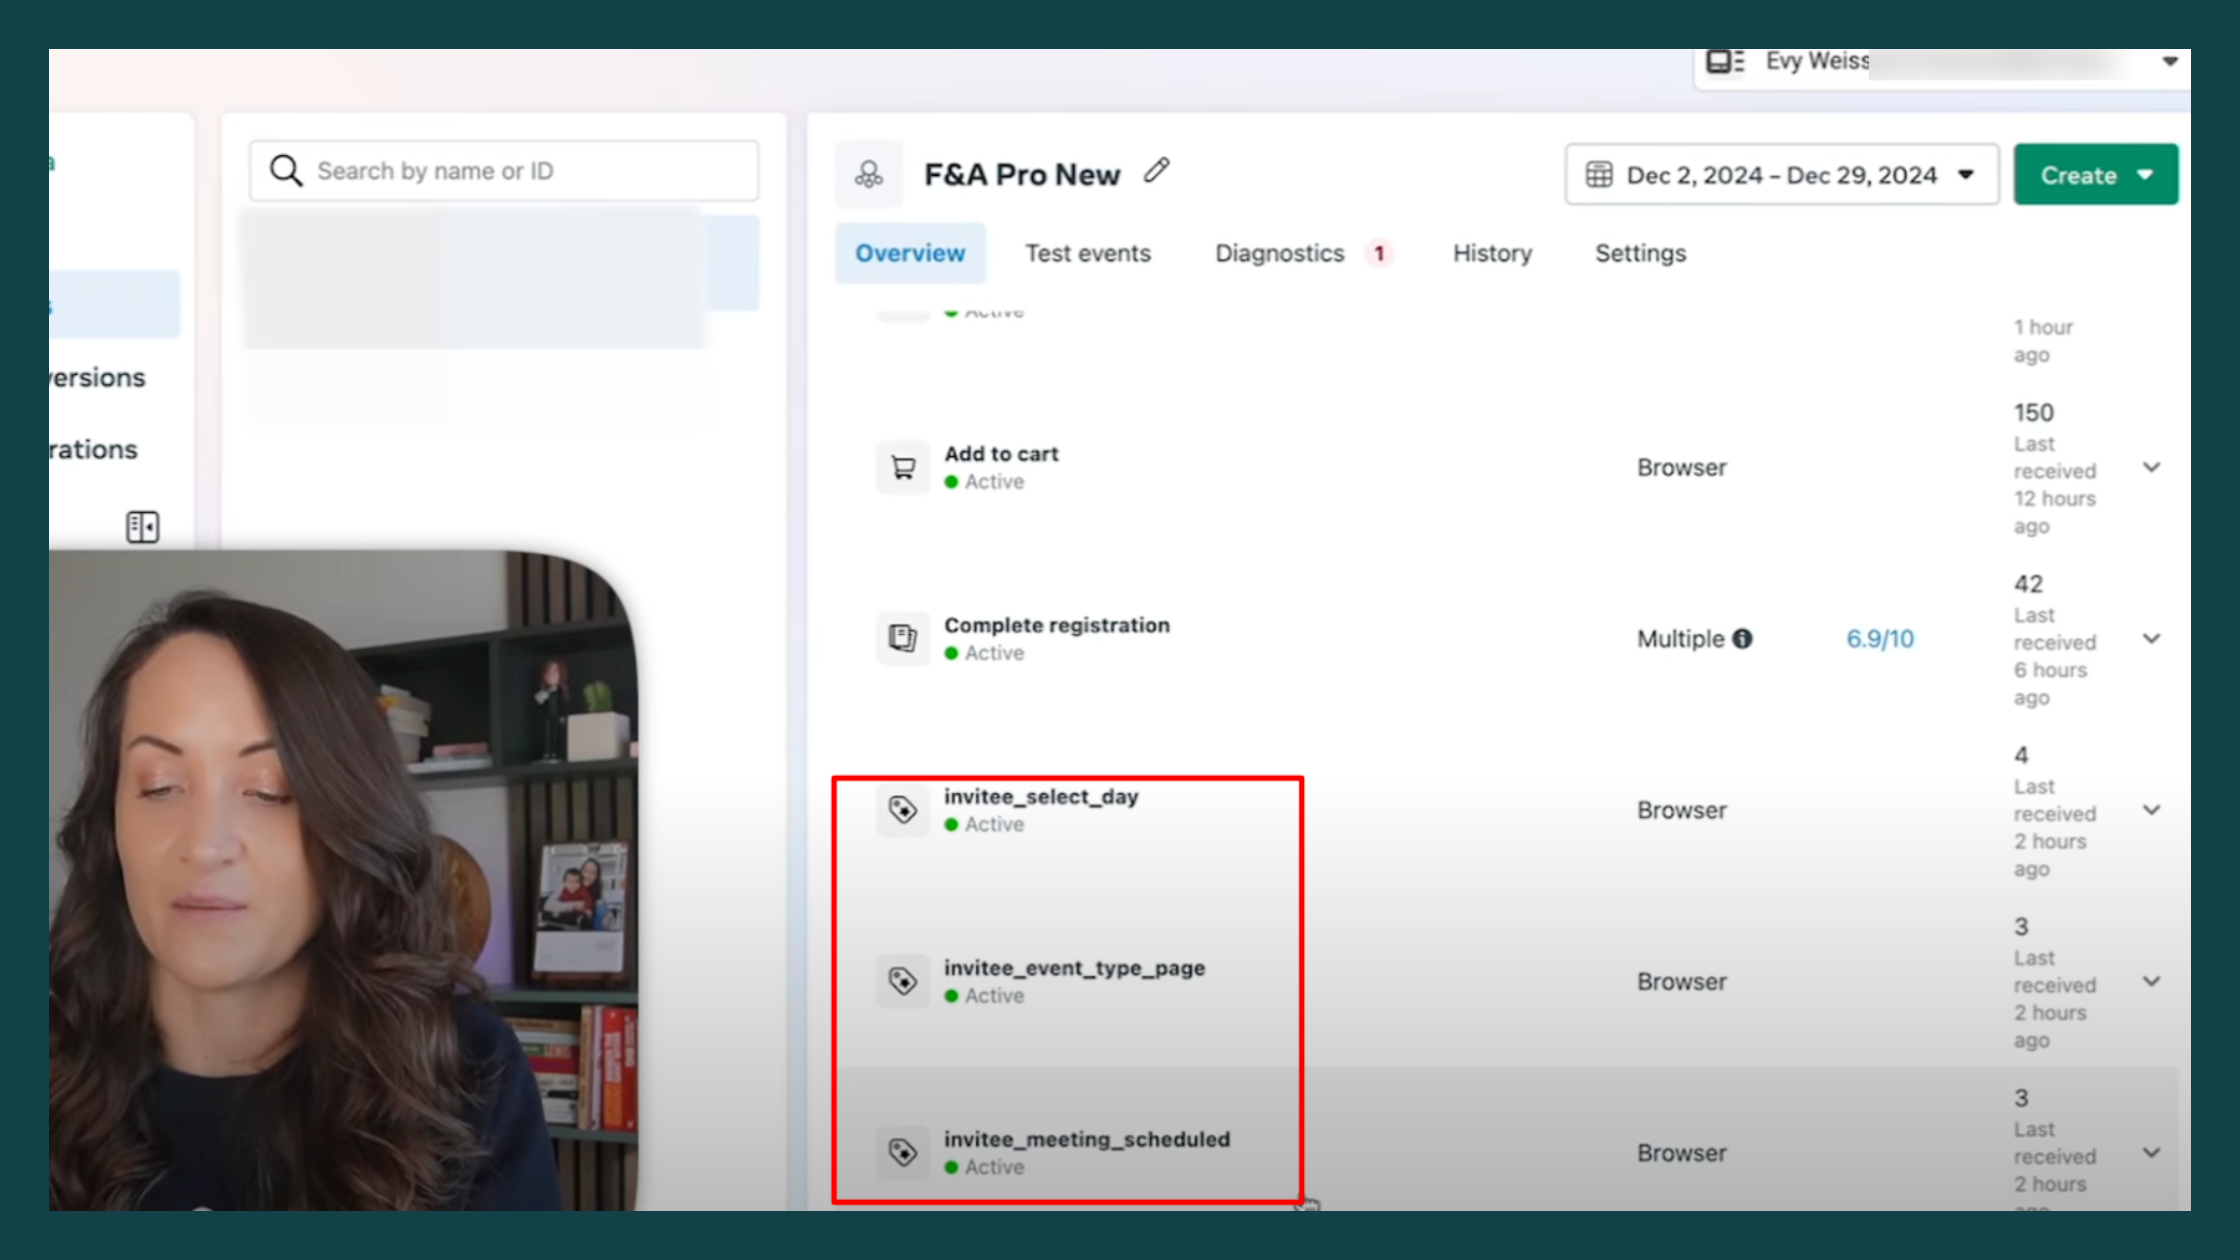
By understanding these three events—Page View, Invitee Select Time, and Invitee Meeting Scheduled—you can make data-driven decisions to refine your campaigns, retarget effectively, and improve your overall booking flow.
Sometimes, when setting up the integration for the first time, you might see a red triangle with an exclamation mark as a warning. Don’t worry—it’s a quick fix. Simply click on the warning, follow the prompt to manually confirm the conversion event, and click “Yes.” It’s super simple and ensures everything is set up correctly.
Managing Traffic Permissions
Another important step is to manage your traffic permissions by adding Calendly™ to your allow list. Here’s how to do it:
- Go to your Settings in Facebook™ Events Manager.
- Click on Edit under traffic permissions.
- Add calendly.com to your allow list.
- Save your changes.
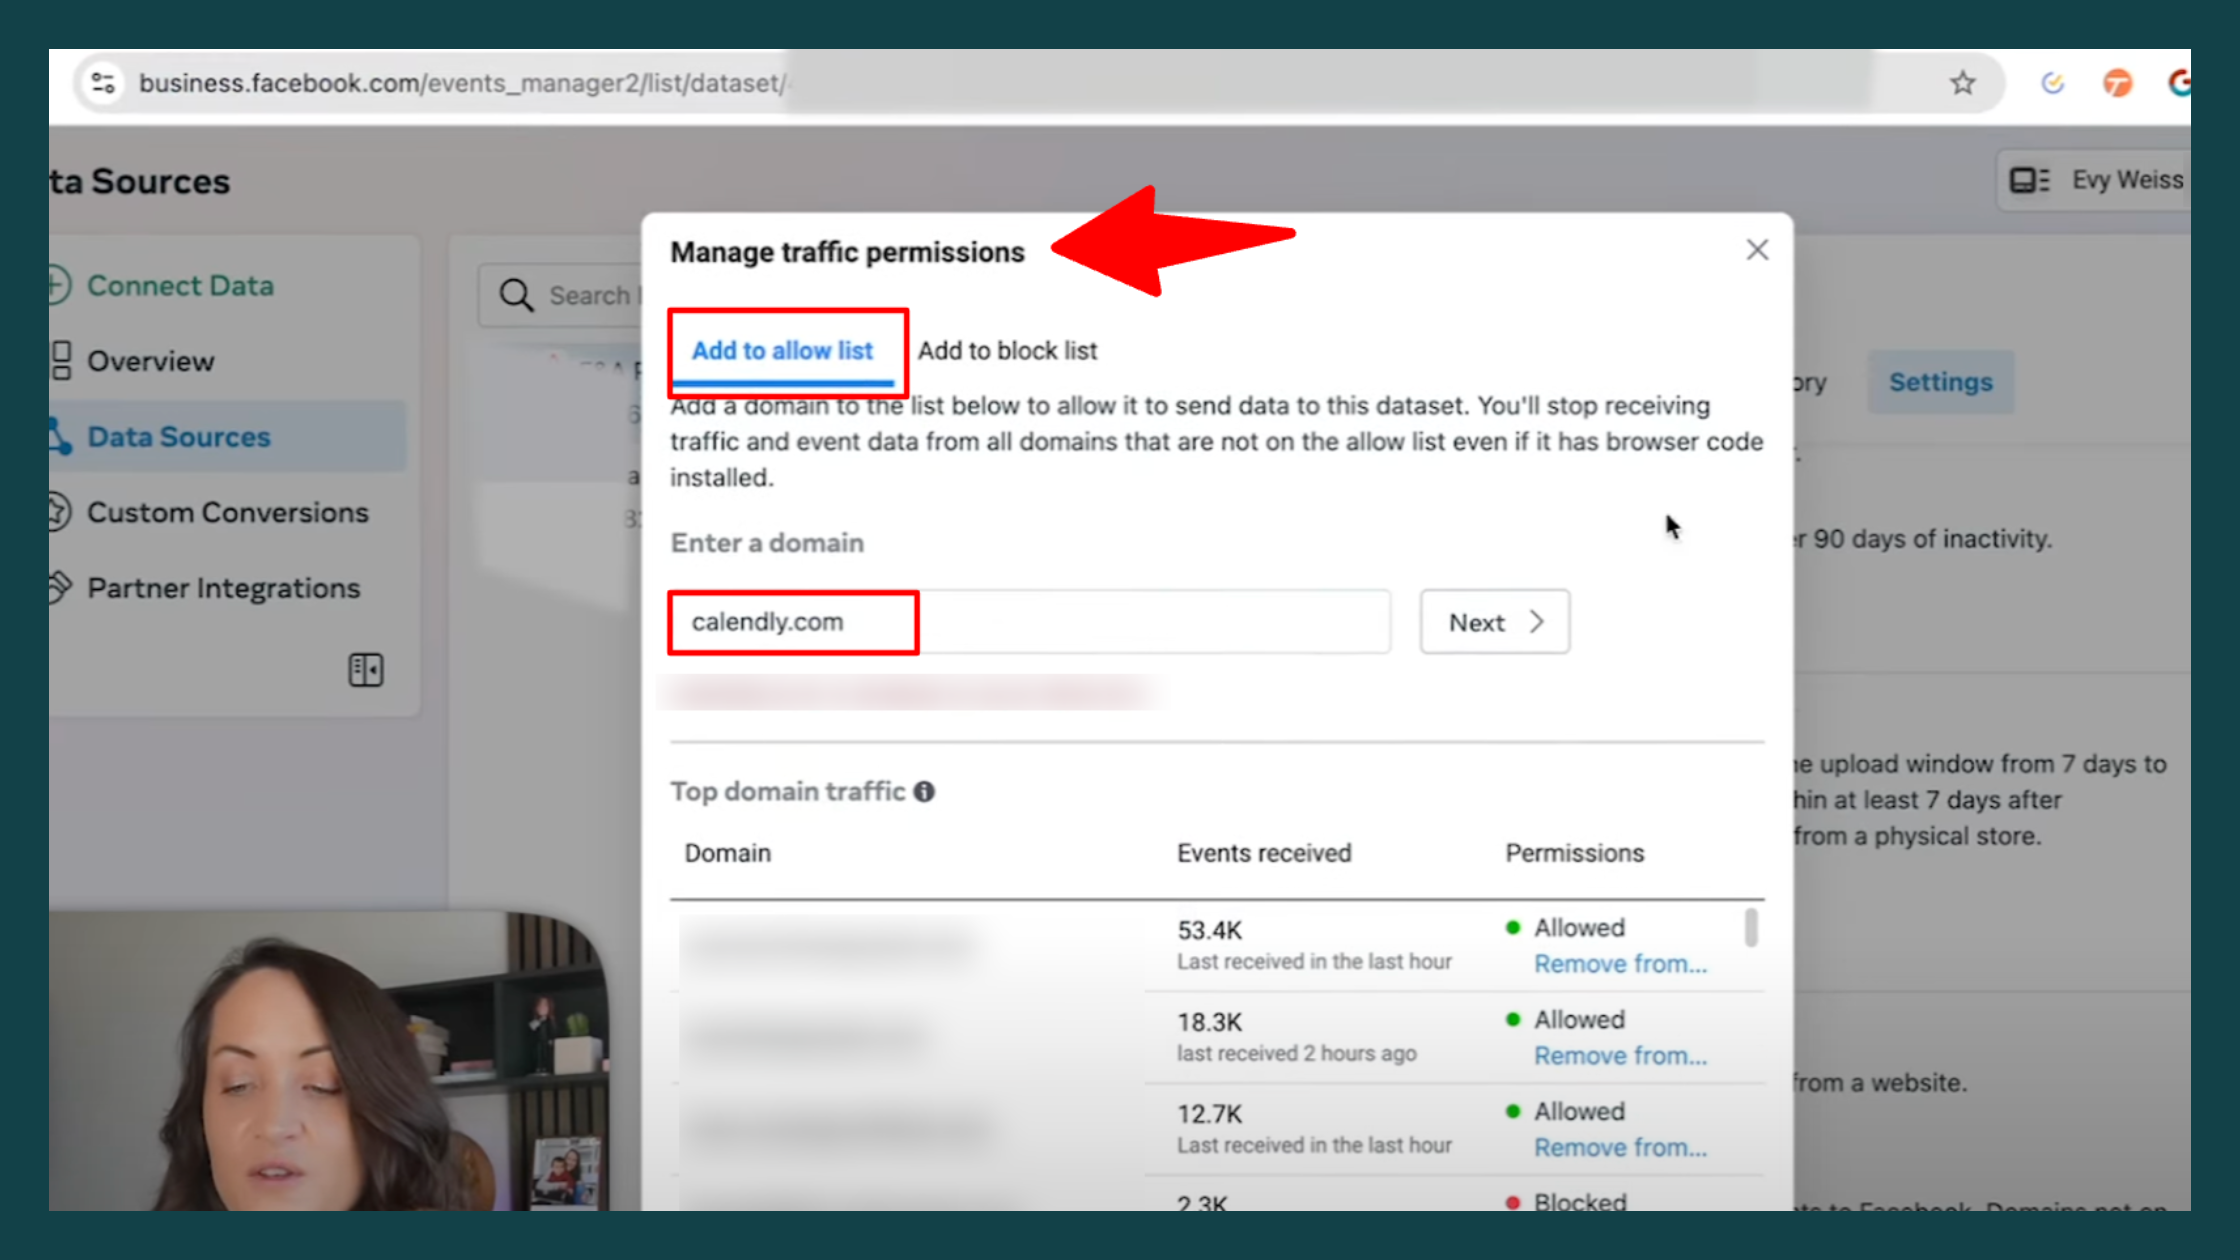
This step ensures that Calendly™ is authorized to send data to Facebook™, allowing your integration to function seamlessly.
Create a Facebook™ Advantage+ Shopping Campaign
Once you’ve set up your booking calendar, you’ll need to set up an Advantage+ Shopping Campaign. This campaign will drive traffic either directly to your booking page, video sales letter, or webinar funnel before sharing the booking link.
Here’s how to set it up:
#1: Go to your Facebook™ Ads Manager and click Create. Select the Sales campaign objective and choose the tailored campaign setup option.
#2: In the campaign setup, navigate to the Website option.
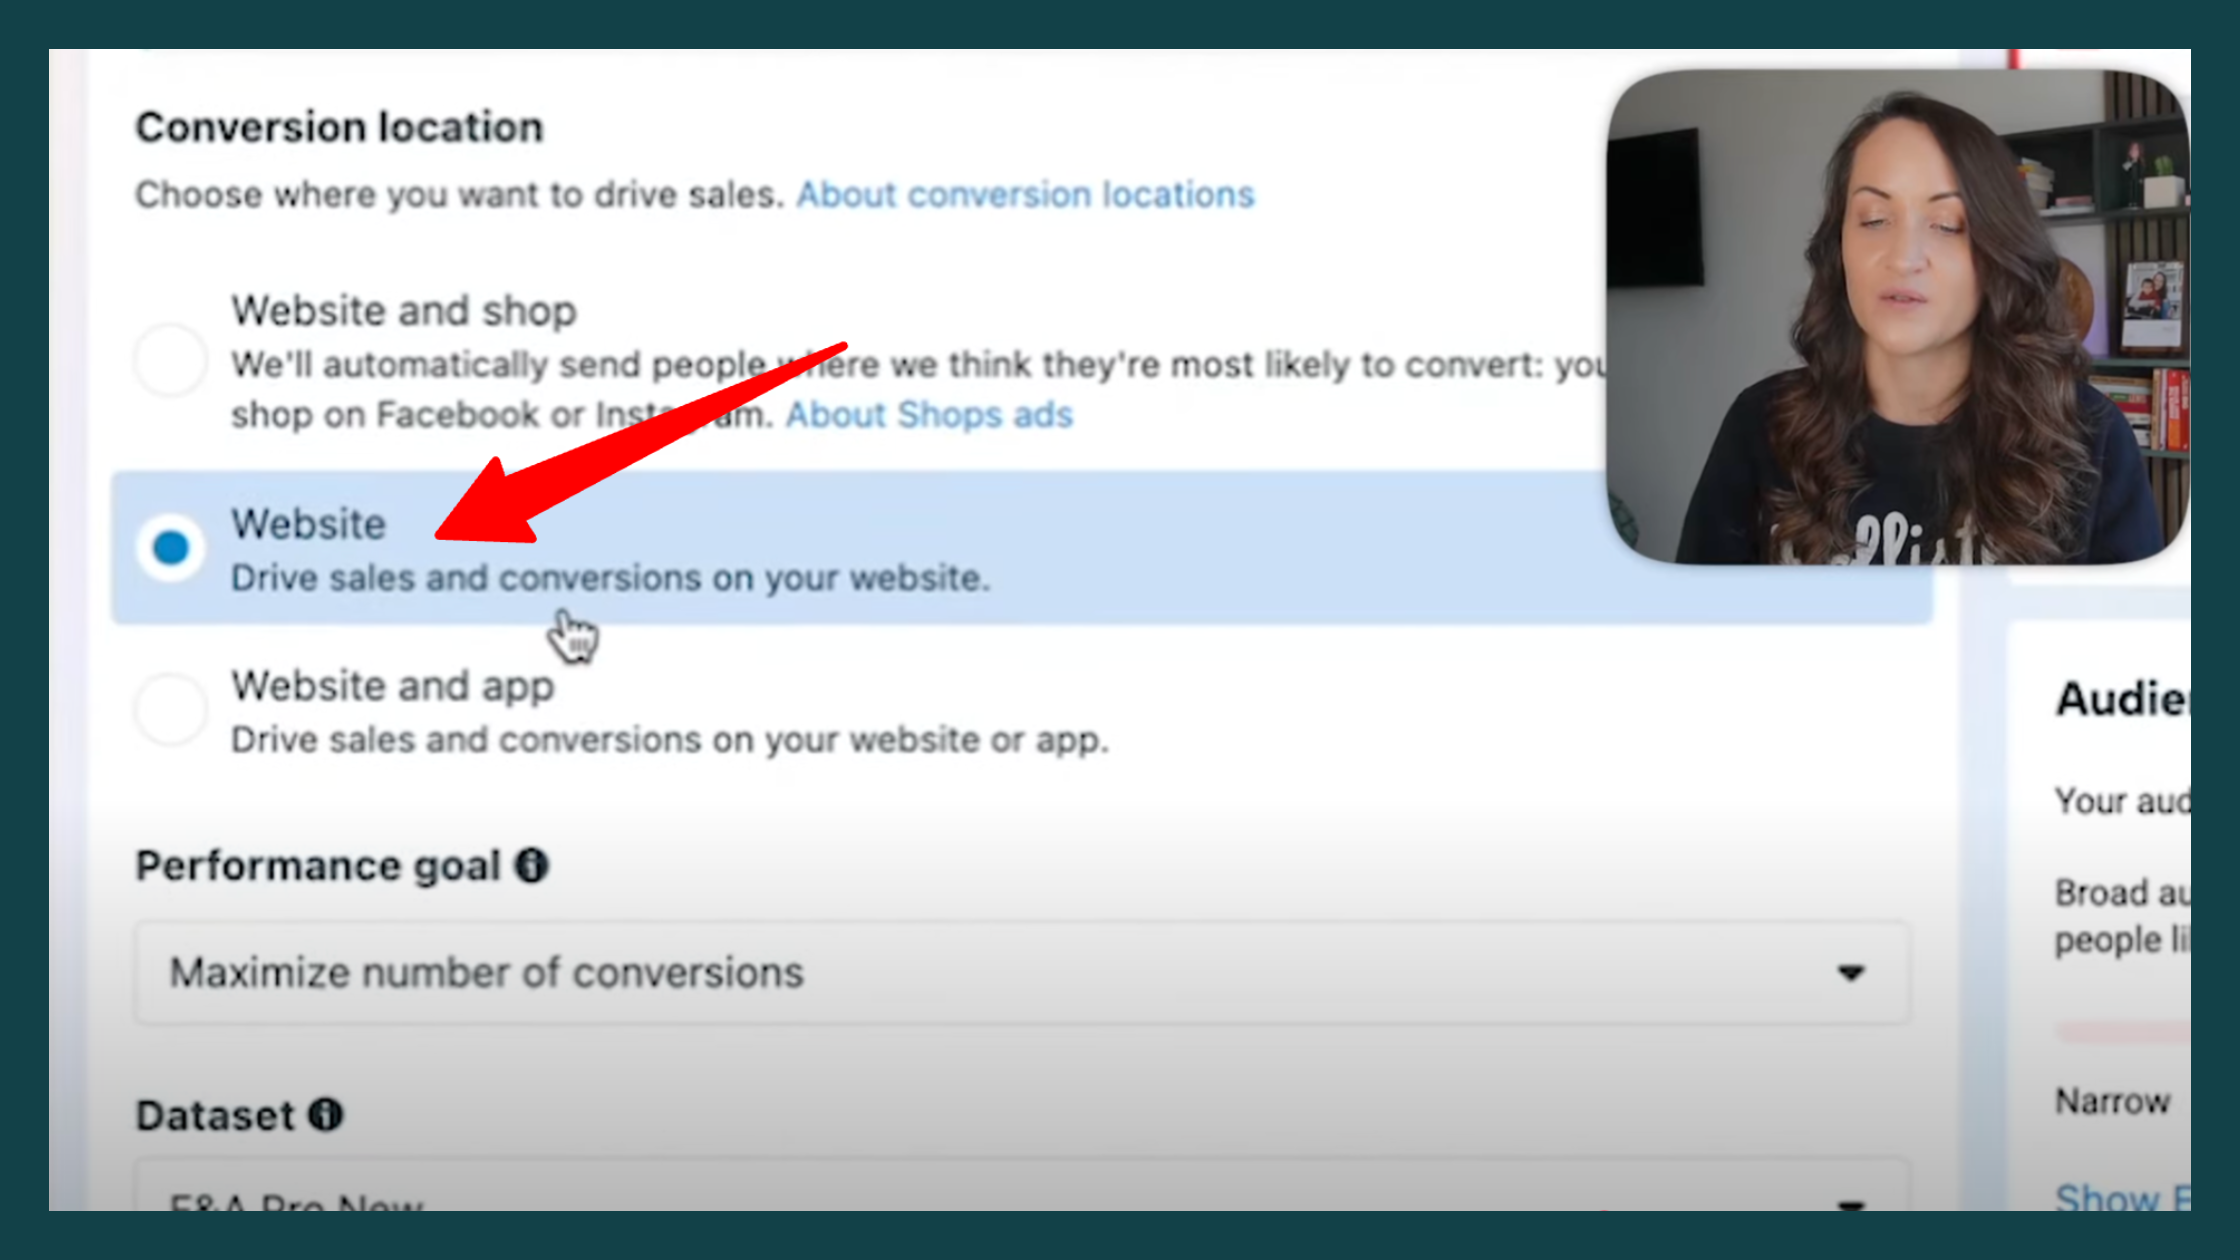
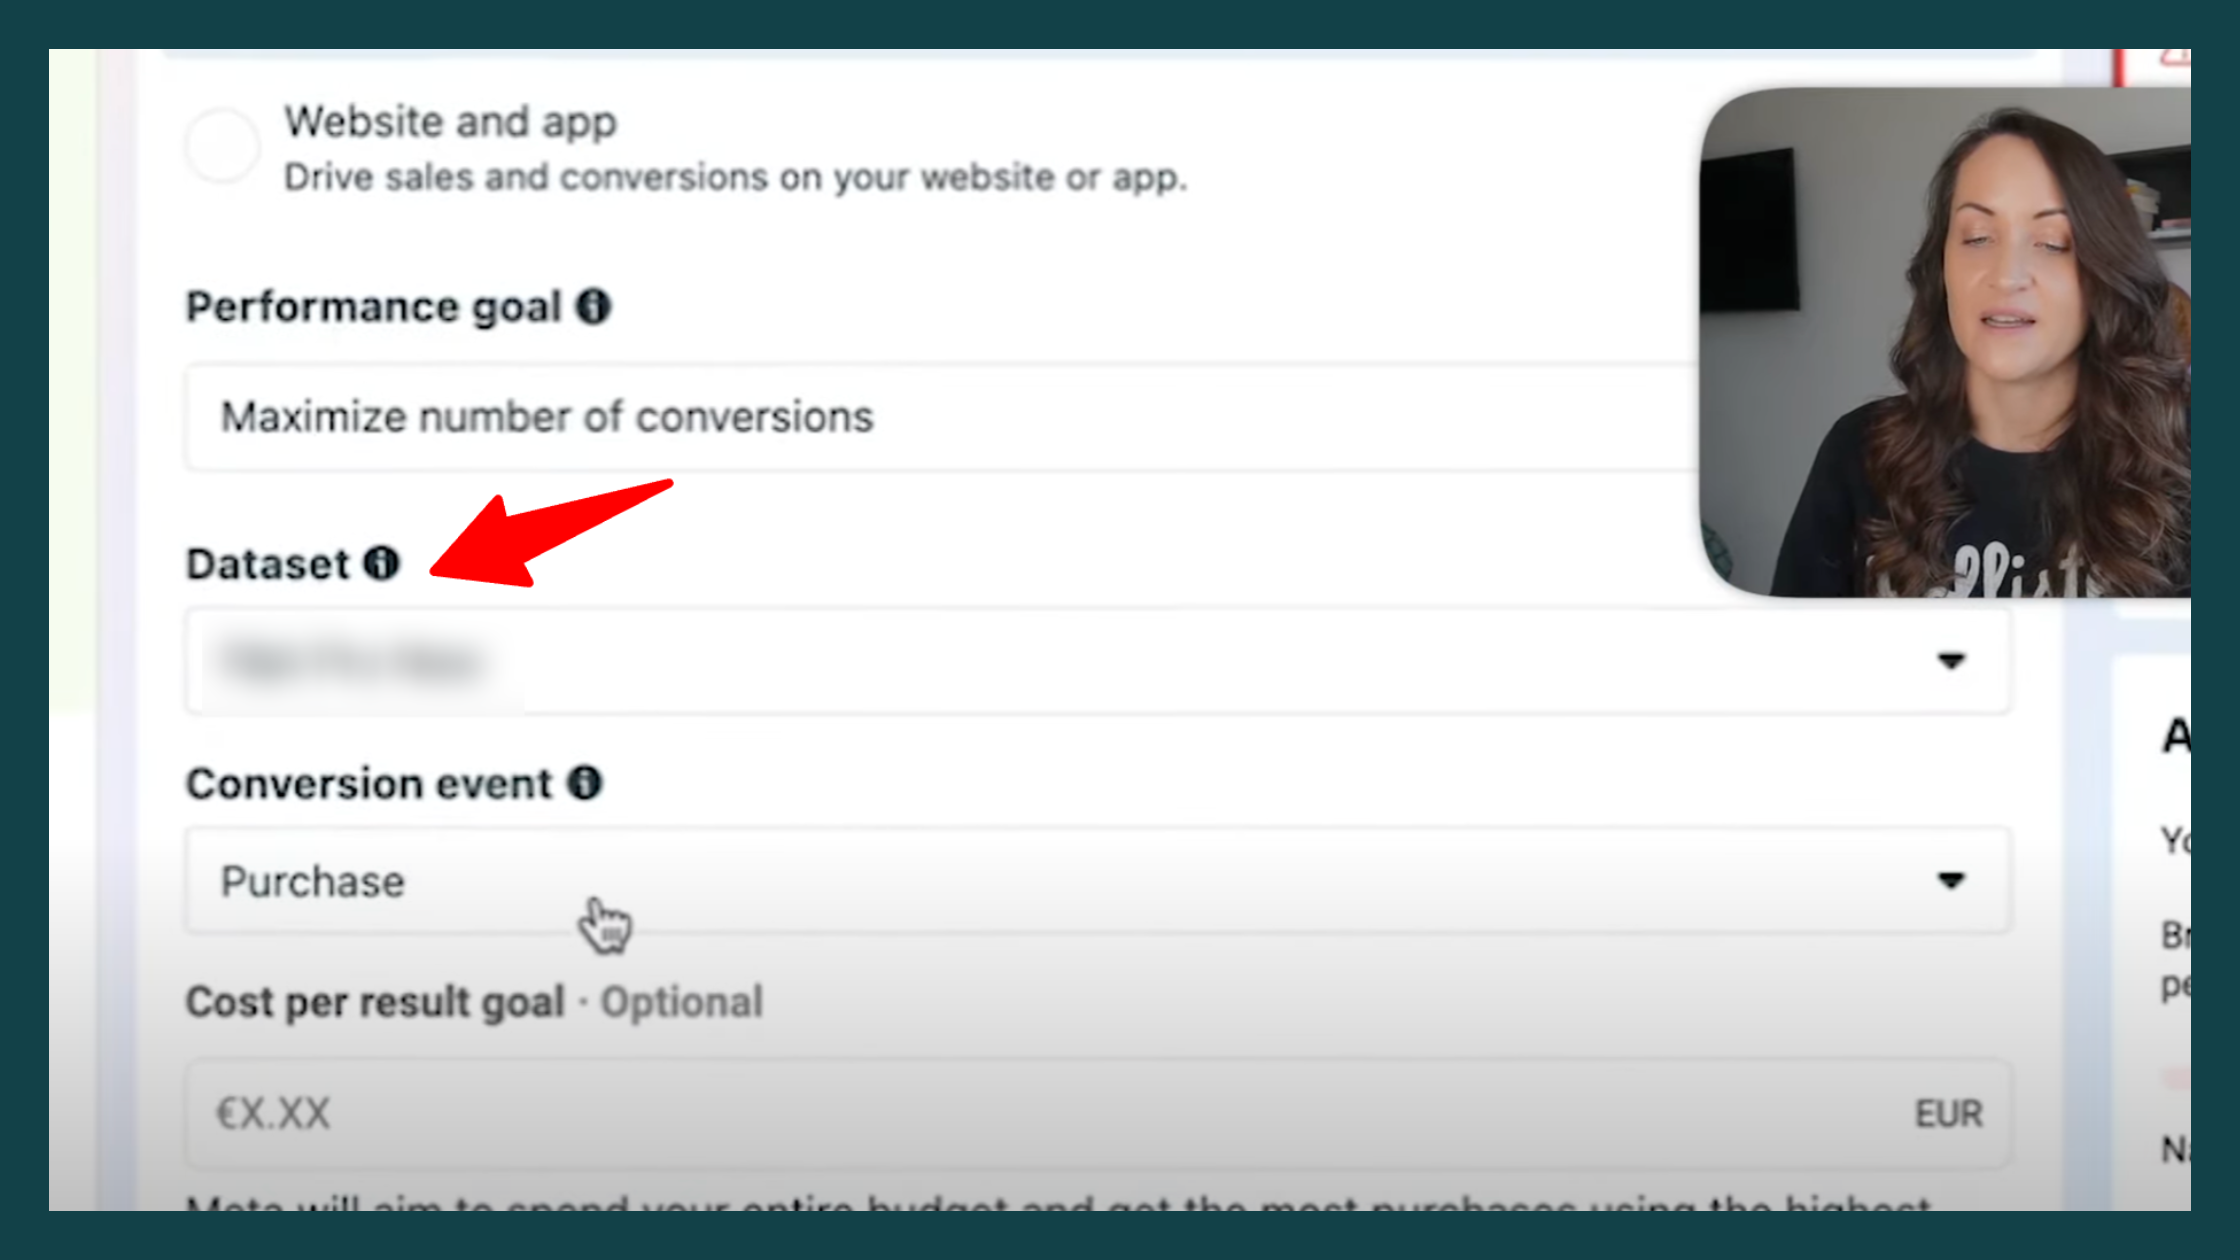
#4: Instead of choosing options like Lead, Complete Registration, or Scheduled (which you might have used before), select Invitee Meeting Scheduled as your optimization event.
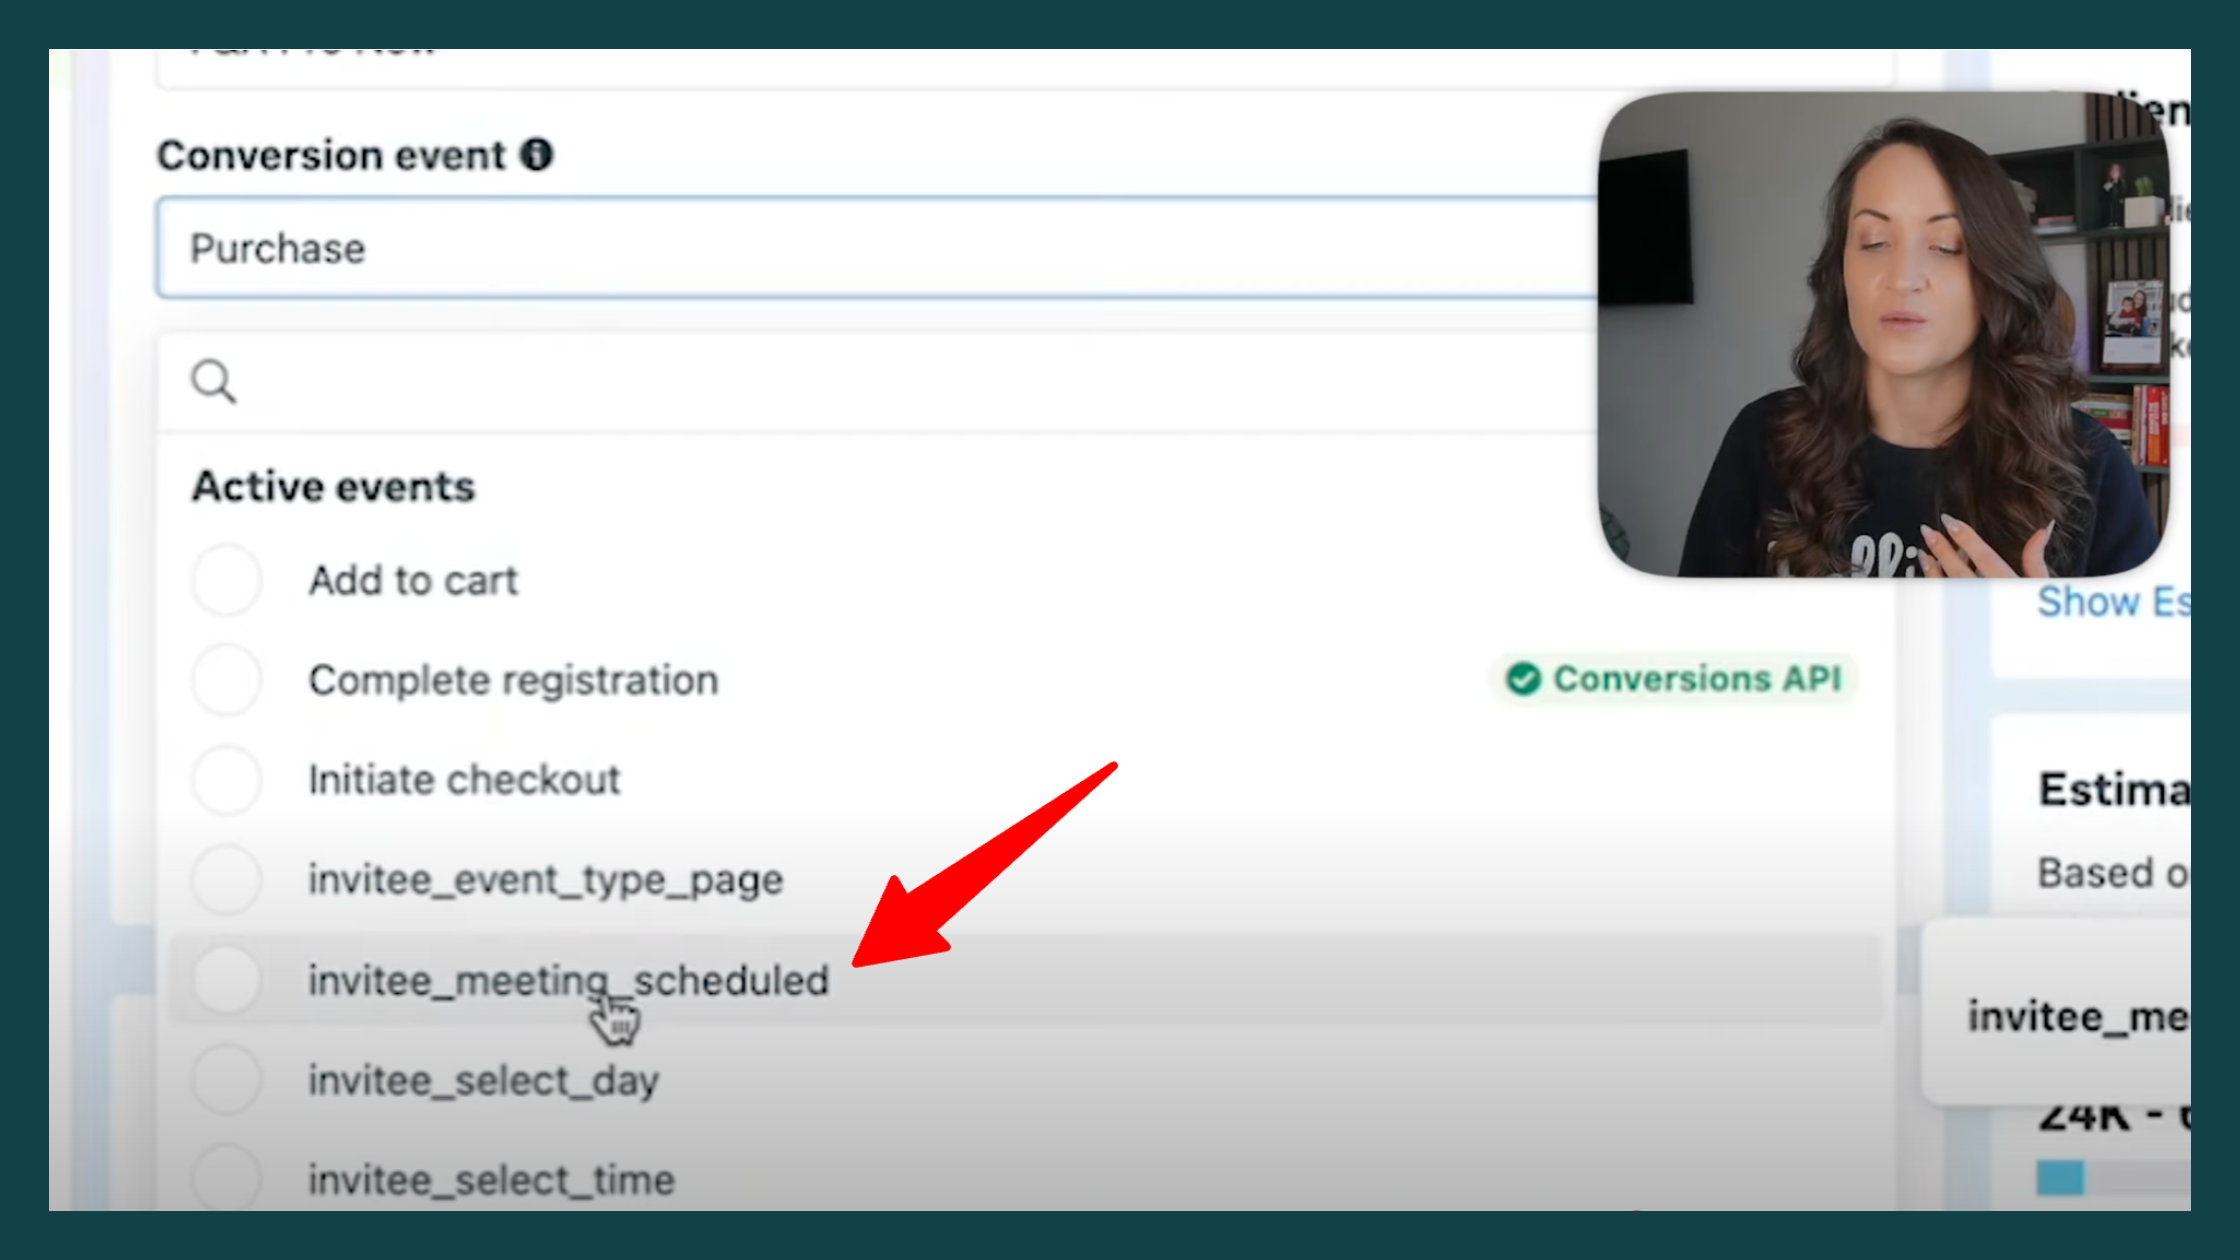
This ensures that your campaign is specifically optimized to drive completed bookings through Calendly™. Once you’ve configured these settings, proceed to finalize your campaign setup and publish it.
Tips for Creating Your Ad
When it comes to creating an ad for your Advantage+ Shopping Campaign, keeping it simple and authentic can make all the difference. Here’s how I approach it:
Use Lifestyle Images
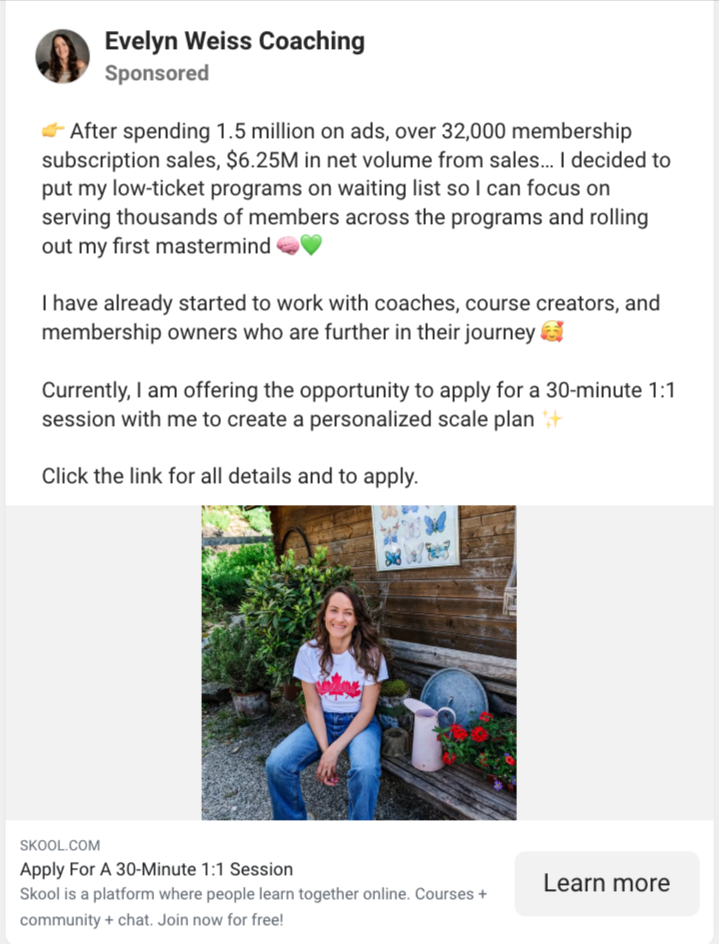
Choose a clear, natural image of yourself in a relatable environment. It doesn’t need to be overly polished or extravagant—just something that feels real and approachable. For example, I used a photo of myself in a nice setting, where people could see me clearly, and it felt personal.
Share Your Experience
In the ad copy, be transparent about your expertise and what you’re offering. I mentioned my background and explained that the free session was an opportunity to create a personalized scale plan, as well as part of the application process for my mastermind program. This way, people understood the purpose upfront.
Be Transparent About Your Intentions
Let people know that while the session is designed to explore working together, it’s also meant to deliver real value. Even for those who aren’t the right fit for your program, the session still provides actionable insights.
Avoid Overhyped Promises
Keep the tone of your ad grounded and focused on building trust. Ads that are authentic and relatable attract higher-quality leads who are genuinely interested in your offer.
How I Personally Do This
In my process, I send people to an application page for my mastermind program, which I host in a Skool™ community. This page includes all the details about the program, so potential clients can learn everything they need to know before taking the next step.
If they find the information interesting and aligned with their goals, they can submit an application form directly on the page. From there, I review the applications to determine if the person is a good fit. If they are, I send them an invitation to schedule a call.
This approach ensures I’m spending time only with qualified leads who are genuinely interested and aligned with what I offer, making the process more efficient and effective for everyone involved.
The Key to Booking Calls
When it comes to booking calls, trust plays a huge role. People want to feel confident about who they’re reaching out to, so the more authentic and human you can be in your ads, the better. Avoid fancy promises or overly polished claims—keeping it real and straightforward will not only build trust but also attract higher-quality leads who genuinely resonate with your offer.
I hope you found this guide insightful and helpful. Now it’s your turn to put it into action.
Resources Mentioned in This Blog Post
Here’s a quick overview of the resources mentioned throughout this blog post to help you get started:
Facebook™ Ads: Used to create Advantage+ Shopping Campaigns for driving traffic and optimizing bookings.
Calendly™: A scheduling tool to streamline call bookings and integrate with Facebook Pixel for tracking.
Grow With Evelyn: A membership program designed to support coaches, course creators, and membership site owners.
Scale With Evelyn: A high-ticket mastermind program offering personalized guidance and support.

Join My Mailing list
Updates to your inbox
Disclaimer: Results shared in this post are based on my personal experience. Your success will depend on multiple factors, including your effort, strategy, and willingness to take action. There are no guarantees, but with the right approach, you can see meaningful results.
AI Note: I use AI tools to assist with content creation, but all ideas, strategies, and personal insights shared in this post are my own. AI helps streamline my workflow, but I personally craft and refine every piece of content to ensure authenticity and quality.